

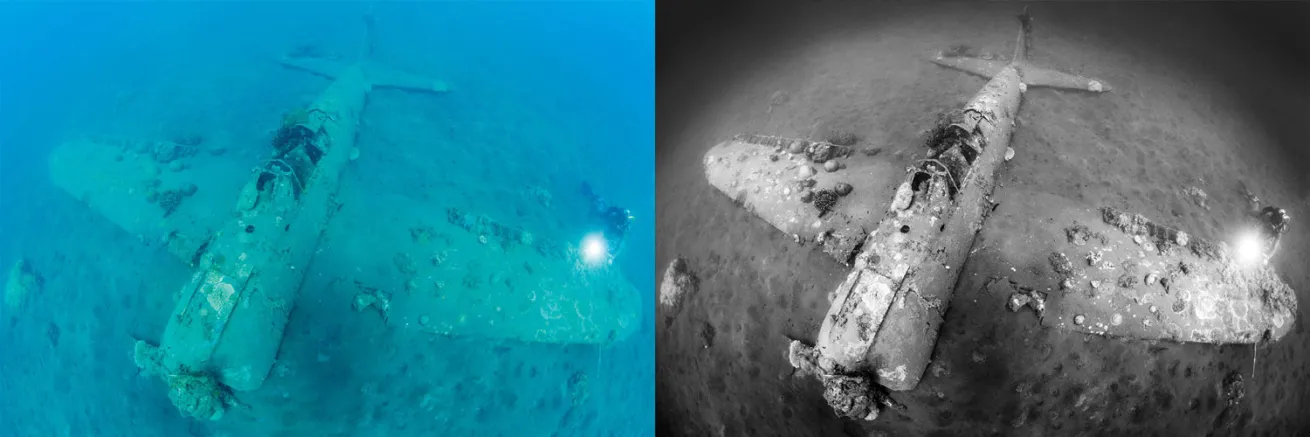
The first step to making a good black-and-white image is implicit in its name. You’ve got to have clean black and real white somewhere in your photo. For the best black-and-white conversion, you should shoot in RAW, which delivers up to 65,536 shades of gray, while JPEG gets you a paltry 256. The richness of a RAW file gives you enormous flexibility in post. If your camera doesn’t offer the option of RAW, you should shoot in color and do your black-and-white conversion in Lightroom or Photoshop. You’ll have a more supple file to work with, and more of a role in the artistic decision-making. Something else to consider: When color is not a factor, contrast becomes king. If you’re not using color to grab attention, then contrast, form, pattern and movement lead the eye. Choose subjects like sharks, whales, rays, schooling fish, silhouettes and wrecks that don’t rely on color for impact. Not every image is a good candidate for black-and-white conversion. I’ve chosen a wreck for this example because they’re often shot with flat light in crappy conditions, but they are full of contrast, form and texture, making them perfect for black-and-white conversion.
1. Before switching to black-and-white, make some basic corrections to the color image. Start by choosing the best option from the profiles in the Camera Calibration panel (RAW formats only), then head back to the Basic panel. Set the White Balance, and wrangle Exposure and Contrast into the ballpark. Next, set the white and black points using the White and Black sliders. A cool way of seeing exactly where the white and black points fall is to hold down Option (Mac) or Alt (PC), then click and drag on the White or Black slider. Lightroom reveals a clipping preview screen that displays color where any channel reaches pure black or white. Move the slider until you begin to see clipping appear, then back it off a smidge. If your image gets blown out or crushed (too dark) when you set the white and black points, use the Highlights and Shadows sliders to restore detail.
2. Make a black-and-white conversion by clicking on the Black and White Treatment option at the top right of the Basic panel (keyboard shortcut “V”). Unfortunately, Lightroom’s default black-and-white conversion is usually far from compelling. Spice it up by re-adjusting the Basic panel sliders. Continue to check for clipping, and please go easy on Clarity! You can add it selectively later. Friends don’t let friends overuse Clarity.
3. Refine your image using the Black and White panel. Each slider in the Black and White panel controls the brightness of its related color channel. If you don’t remember what was blue or what was aqua in your image, no worries — you can use the Targeted Adjustment Tool (TAT) to intuitively adjust the lightness and darkness of each color. Activate the TAT, place it on top of the image, and simply click and drag up or down to lighten or darken that part of your picture. Don’t forget to check your work at 1-to-1 magnification — it’s easy to get some embossed-looking edges if you lean too hard on these sliders. Once you’ve adjusted the image to your liking, you can see a before and after by toggling the Panel On/Off switch.
4. Create focus and detail with Local Tools. The Adjustment Brush and Radial Filter are a dynamic duo when it comes to detailing your shot. Use the Adjustment Brush with Clarity to add pop to textures, dappled light and sun rays. The Radial Filter excels at creating lighting effects and custom vignettes. You can lead the viewer’s eye to any place in your image by building light where you want it. Using the Radial Filter is very much like being able to add a strobe in post.
5. Check Before and After views often using Keyboard Shortcuts.
– Backslash “ \ ” compares the original version to the current edit.
– “ Y ” reveals a side-by-side before and after.
– Command-click (Mac) or R-click (PC) on any History step, and choose “Copy History Step Settings to Before” in order to make it the “Before” view.
– Toggle Panel On/Off switches to review adjustments made in just that panel.
Erin Quigley is an Adobe ACE certified digital-imaging consultant and an award-winning shooter. GoAskErin.com provides custom tutorials and one-on-one instruction for the underwater photographic community.
Erin QuigleyConverting a color photo to black-and-white is not always as easy as adding a filter.
The first step to making a good black-and-white image is implicit in its name. You’ve got to have clean black and real white somewhere in your photo. For the best black-and-white conversion, you should shoot in RAW, which delivers up to 65,536 shades of gray, while JPEG gets you a paltry 256. The richness of a RAW file gives you enormous flexibility in post. If your camera doesn’t offer the option of RAW, you should shoot in color and do your black-and-white conversion in Lightroom or Photoshop. You’ll have a more supple file to work with, and more of a role in the artistic decision-making. Something else to consider: When color is not a factor, contrast becomes king. If you’re not using color to grab attention, then contrast, form, pattern and movement lead the eye. Choose subjects like sharks, whales, rays, schooling fish, silhouettes and wrecks that don’t rely on color for impact. Not every image is a good candidate for black-and-white conversion. I’ve chosen a wreck for this example because they’re often shot with flat light in crappy conditions, but they are full of contrast, form and texture, making them perfect for black-and-white conversion.

Erin QuigleyThe histogram is your friend during the conversion process. Keep an eye on the small triangles at the upper right (whites) and left (blacks) corners of the histogram panel. When they light up, it’s because at least one color channel is clipping, and it’s time to back of.
1. Before switching to black-and-white, make some basic corrections to the color image. Start by choosing the best option from the profiles in the Camera Calibration panel (RAW formats only), then head back to the Basic panel. Set the White Balance, and wrangle Exposure and Contrast into the ballpark. Next, set the white and black points using the White and Black sliders. A cool way of seeing exactly where the white and black points fall is to hold down Option (Mac) or Alt (PC), then click and drag on the White or Black slider. Lightroom reveals a clipping preview screen that displays color where any channel reaches pure black or white. Move the slider until you begin to see clipping appear, then back it off a smidge. If your image gets blown out or crushed (too dark) when you set the white and black points, use the Highlights and Shadows sliders to restore detail.
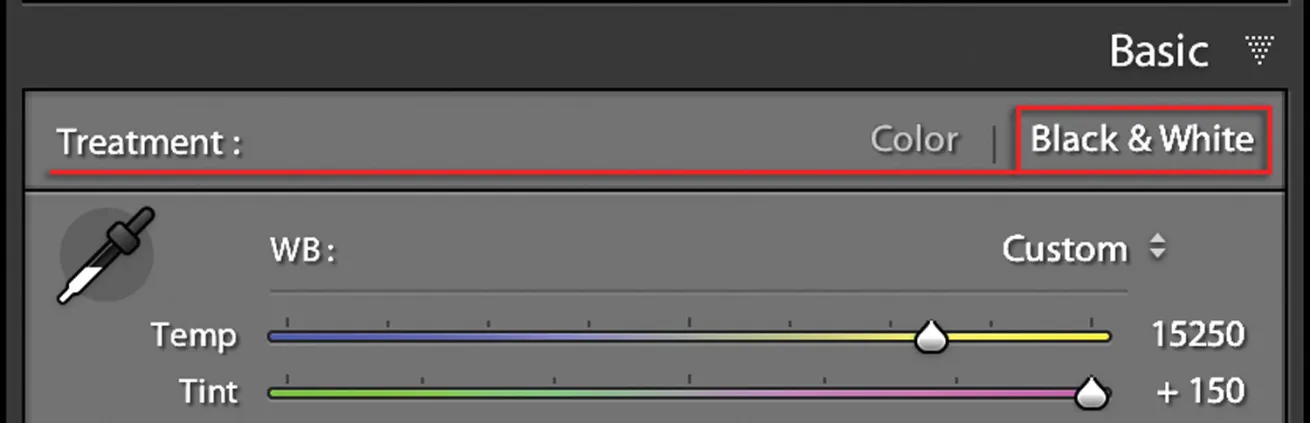
Erin QuigleyMake a black-and-white conversion by clicking on the Black and White Treatment option at the top right of the Basic panel (keyboard shortcut “V”).
2. Make a black-and-white conversion by clicking on the Black and White Treatment option at the top right of the Basic panel (keyboard shortcut “V”). Unfortunately, Lightroom’s default black-and-white conversion is usually far from compelling. Spice it up by re-adjusting the Basic panel sliders. Continue to check for clipping, and please go easy on Clarity! You can add it selectively later. Friends don’t let friends overuse Clarity.
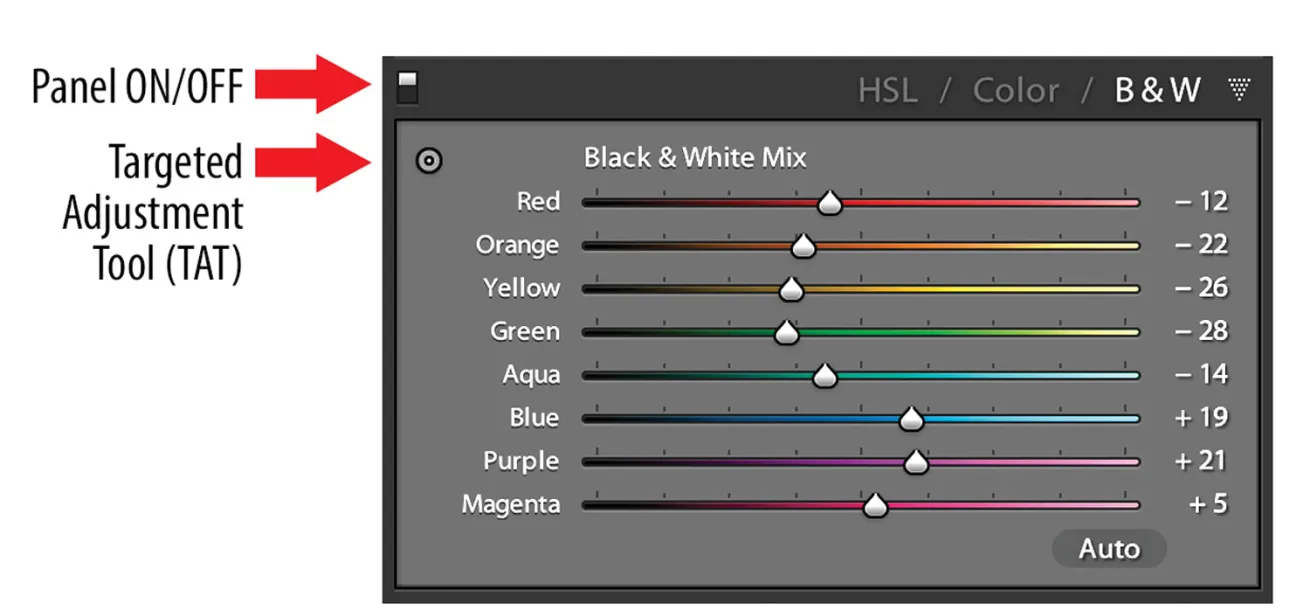
Erin QuigleyRefine your image using the Black and White panel.
3. Refine your image using the Black and White panel. Each slider in the Black and White panel controls the brightness of its related color channel. If you don’t remember what was blue or what was aqua in your image, no worries — you can use the Targeted Adjustment Tool (TAT) to intuitively adjust the lightness and darkness of each color. Activate the TAT, place it on top of the image, and simply click and drag up or down to lighten or darken that part of your picture. Don’t forget to check your work at 1-to-1 magnification — it’s easy to get some embossed-looking edges if you lean too hard on these sliders. Once you’ve adjusted the image to your liking, you can see a before and after by toggling the Panel On/Off switch.
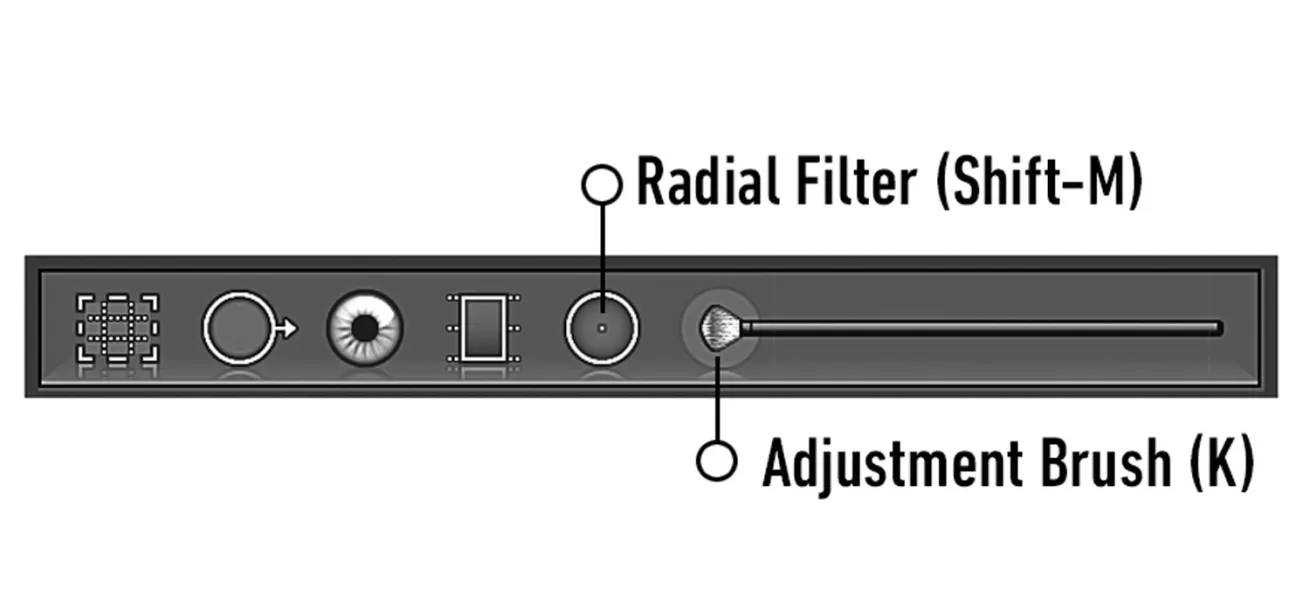
Erin QuigleyCreate focus and detail with Local Tools.
4. Create focus and detail with Local Tools. The Adjustment Brush and Radial Filter are a dynamic duo when it comes to detailing your shot. Use the Adjustment Brush with Clarity to add pop to textures, dappled light and sun rays. The Radial Filter excels at creating lighting effects and custom vignettes. You can lead the viewer’s eye to any place in your image by building light where you want it. Using the Radial Filter is very much like being able to add a strobe in post.
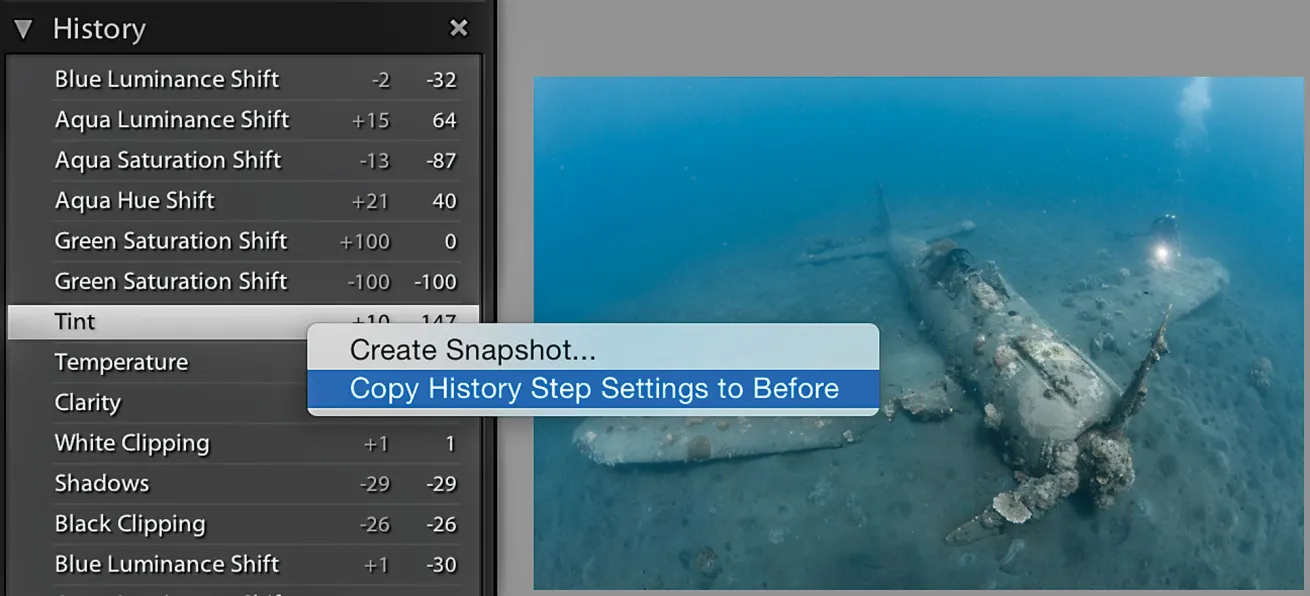
Erin QuigleyCheck Before and After views often using Keyboard Shortcuts.
5. Check Before and After views often using Keyboard Shortcuts.
– Backslash “ \ ” compares the original version to the current edit.
– “ Y ” reveals a side-by-side before and after.
– Command-click (Mac) or R-click (PC) on any History step, and choose “Copy History Step Settings to Before” in order to make it the “Before” view.
– Toggle Panel On/Off switches to review adjustments made in just that panel.
Erin Quigley is an Adobe ACE certified digital-imaging consultant and an award-winning shooter. GoAskErin.com provides custom tutorials and one-on-one instruction for the underwater photographic community.


