

So you’ve got your shiny new camera and are super stoked to take it for its first dive. You hit the water, living out your Nat Geo dreams, then rush home to upload your images. Quickly, you notice something strange is happening–your shots are missing those vibrant colors we see so often on social media and in magazines. Instead, everything looks blue and faded. Is the camera broken? Or are those underwater photo pros using some kind of secret wizardry?
Don’t worry, it’s something underwater photographers of all levels struggle with. Last month, Alan asked, “The colors in my photos often don’t look quite right. How can I set up my camera to overcome this?” Well, get comfortable and grab your favorite snack. This month in Ask a Pro Photographer, we’re going to take a look at some tips for mastering color underwater and using custom white balance.
How Water Affects Light
To achieve color-perfect photos we first need to understand how water and depth affect light. To start, water is 800 times denser than air–causing light to slow down as it moves through water. It’s actually a bit more complicated than this, but if you’re like me and love nerding out on the science check out this video by Fermilab.
The visible spectrum of light is heavily affected when interacting with water, including being essentially absorbed pretty quickly. Within the first 33 feet/10 meters of depth, roughly 50% of visible light is absorbed. But different color wavelengths are absorbed at different rates. Red, being the longest wavelength with the lowest energy, is filtered out first. The loss of the color red is dramatic and can be seen as shallow as only 20 inches/50 centimeters underwater!
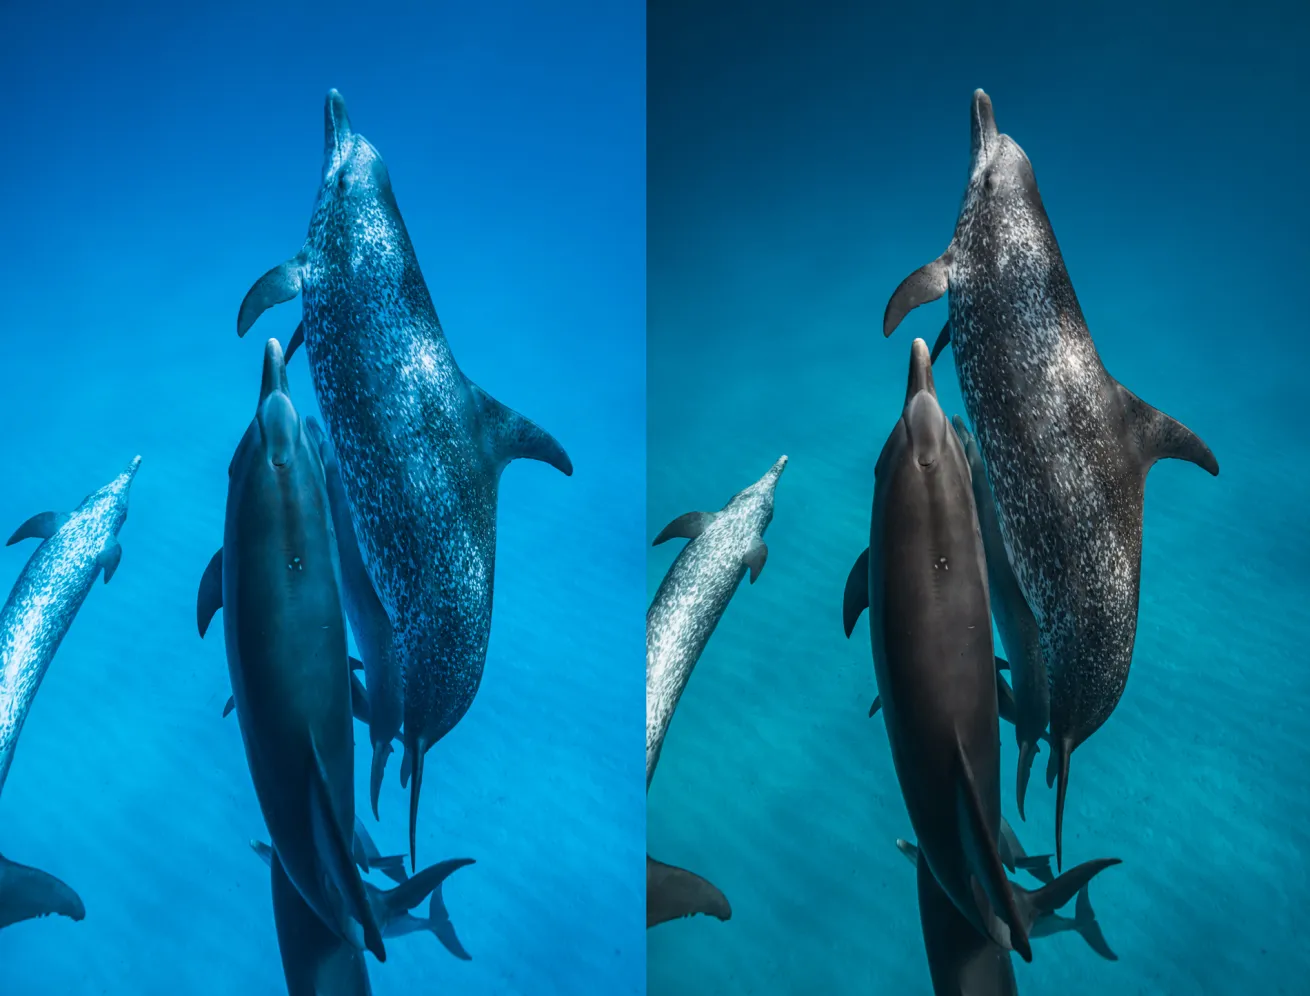
Jay ClueThe only difference between these two panels is the white balance setting. The left panel shows what the dolphins look like using auto white balance at roughly 20 feet/6 meters underwater, the right panel shows the same shot using custom white balance.
At 15 feet/5 meters of depth, we’ve already lost 90% of the reds. On the other end of the rainbow, blue and violet have shorter wavelengths with more energy, so they are able to penetrate much deeper into the water.
These effects on light underwater have strong implications for our photos and videos. We lose color, contrast and dynamic range as we go deeper. So, how do we fix this? Well, I’m glad you asked!
Get Familiar with Custom White Balance
If you are shooting with natural light, you’ll want to take advantage of your camera's custom white balance settings. This is essentially telling the camera what white looks like in the current environment so that it can adjust and correct its colors. You’ll want to use custom white balance when you are not using any other light source, such as strobes or video lights.
Almost all cameras these days have a custom white balance feature, with the exception of some action cams and smartphones (although you can tweak the temperature on some). Usually, the process will involve going into your camera's white balance settings, choosing a custom white balance slot and then “capturing” white balance by pointing the camera at something white, gray or neutral colored. Some cameras require you to pull it from a previously shot photo; others, such as Sony Alpha cameras, allow you to do it live.
Keep in mind that custom white balance might work great on shallower dives but not as well on deep dives. Since the light changes with depth, you’ll also want to adjust the white balance whenever you shift about 10 to 15 feet/3 to 5 meters. For example, if you set your custom white balance at 40 feet/12 meters and head up to your safety stop at 15 feet/5 meters, the images will start to look pink since more reds are coming back as you go shallower. The opposite is also true; the images will look more blue when going deeper.
It is important to point the camera at roughly the same angle you will be shooting when setting the custom white balance. For example, if you aim straight down towards a depth with less light to set white balance, then shots captured horizontally will be off a bit.
You’ll also want the neutral color to be of a similar distance from the camera as your subject. If the subject is further, the light must move through more water, causing more color absorption. Some photographers like to carry white slates or gray cards, but you can use other objects such as your buddy’s gray tank, the palm of your hand or a white fin.
Once you’ve gotten comfortable with this, you can take it one step further and manually adjust that custom white balance to really tweak it to how you want it. Not all cameras have this option, but for me, it's something I find helps to dial in the style I’m looking for.
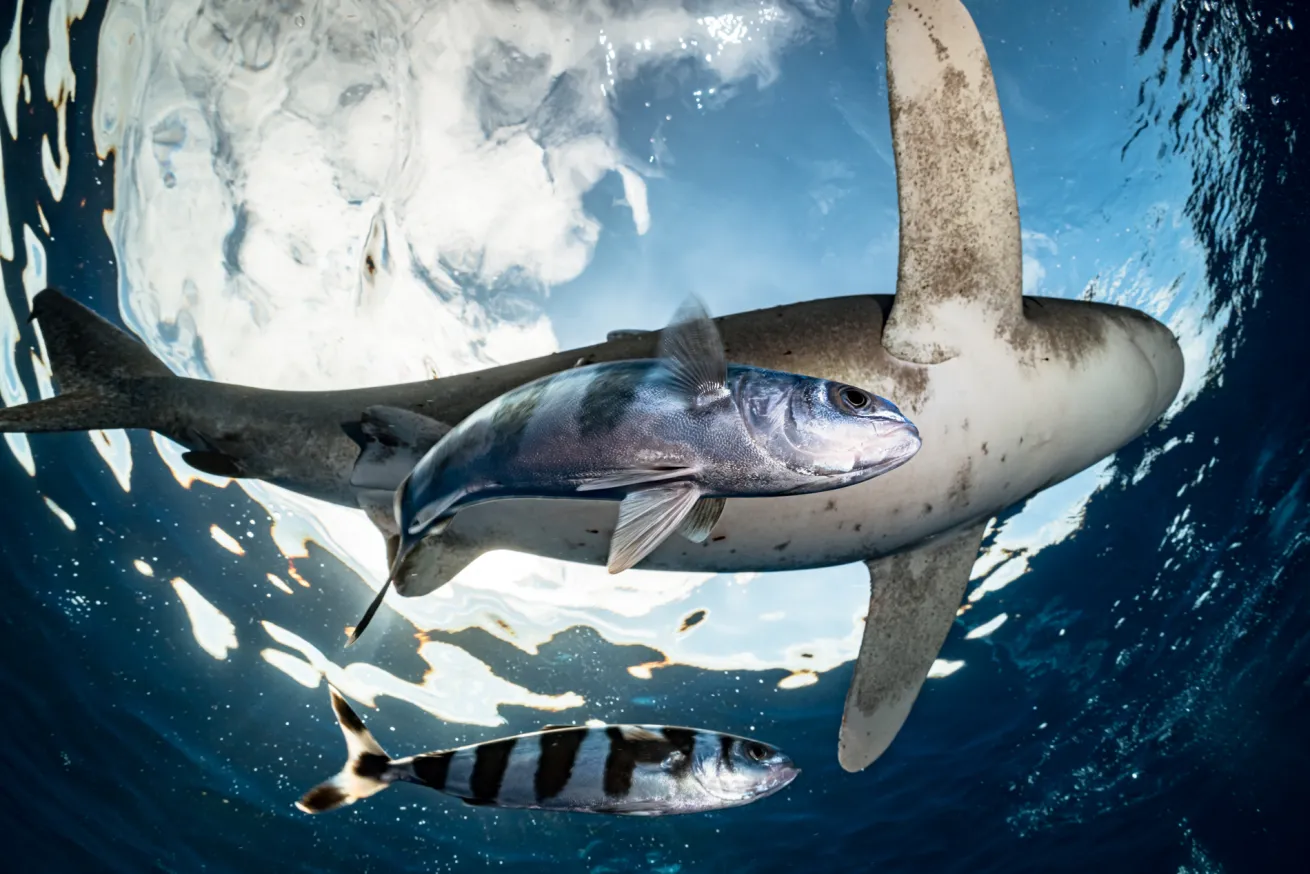
Jay ClueUsing strobes not only helps bring colors back but also allows us to get shots that aren’t possible when using solely natural light. Without strobes, the subjects would have been in silhouette.
Using Artificial Lights
You can utilize strobes or video lights to help get the most vibrant colors–especially when in deeper water. Essentially, whenever we shoot underwater, we are working in a low-light environment due to how much light is lost just by dipping a few feet below the surface.
Strobes and video lights allow us to add light back to the subject–helping not only with color but also with contrast, dynamic range and sharpness. When using lights, we want to set our camera's white balance to either auto (AWB) or to match the color temperature of your lights (in Kelvin). You’ll want to play around with your camera to see which works better for you. On my Sony Alpha 1, the auto white balance works remarkably well underwater and easily matches up with whatever lights I use.
Keep in mind that water also absorbs your light, so your strobes or lights will not illuminate very far from their source. Imagine if you could touch the subject you’re trying to light with the tip of your fin. If your fin wouldn’t reach it, then the chances are your lights are probably not illuminating it the way you’d really want. Now, I shouldn’t have to say this, but don’t actually reach out your fin to try to touch them.
Related Reading: How To Position Strobes: Tips for Underwater Photographers
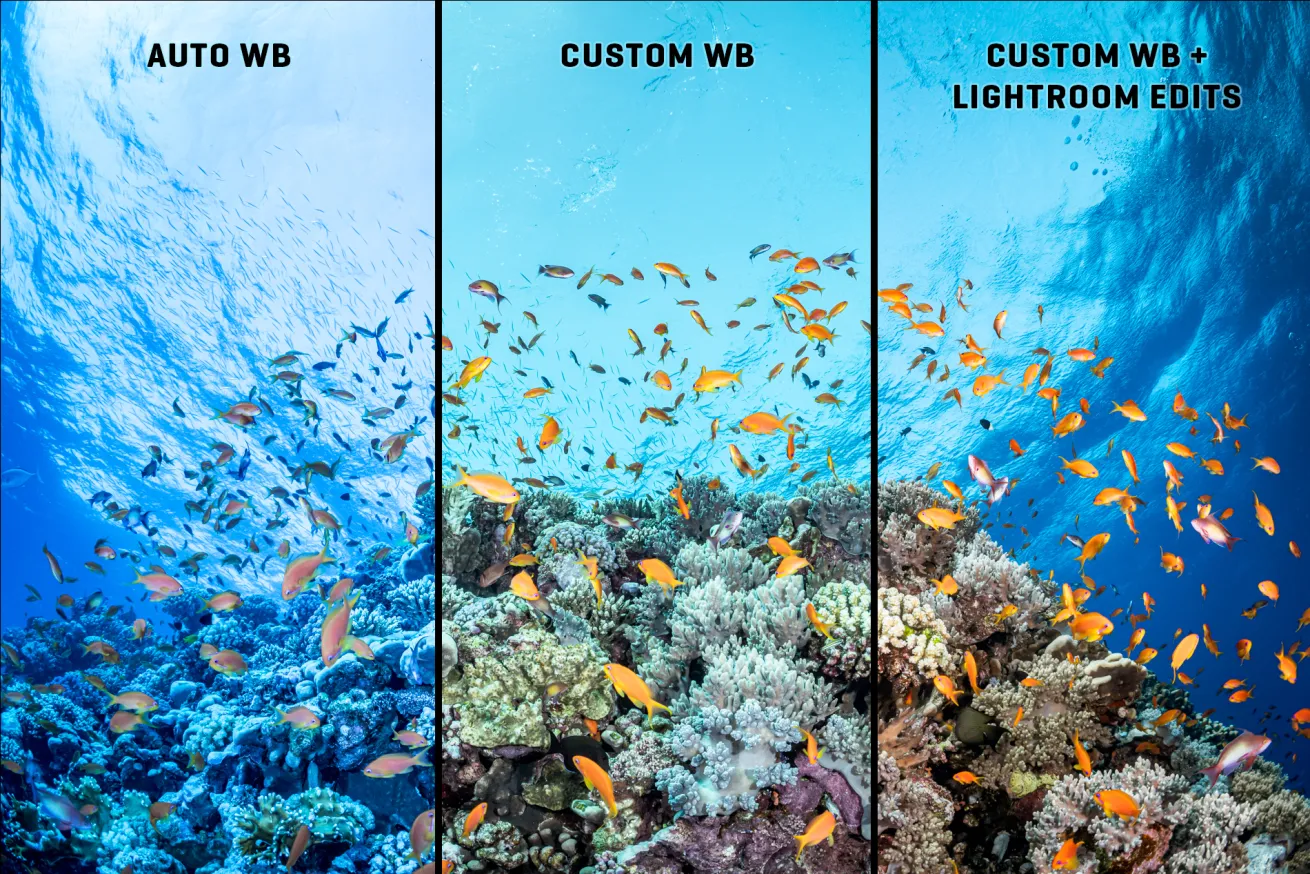
Jay ClueUsing custom white balance and Lightroom together can help restore and enhance the colors for a more vibrant result.
Enhancing with Software and Apps
If you shoot RAW files, instead of JPEG, you will have much more room to correct your colors in post-processing apps such as Adobe Lightroom. The specific process will depend on which software you are using, but in general, there will be two sliders to adjust the temperature and tint. Temperature will primarily affect your blues and ambers, or in other words, how warm or cool the image appears. This can also be used to match the temperature of your scene or lights. The tint slider will work more with green and magenta color casts in your images.
Additionally, an eyedropper tool allows you to select a target neutral color in the image for the software to correct the white balance automatically, similar to how we did it underwater. When using the dropper, select a neutral color on the part of the subject that is closest to the camera.
Now I can already hear you asking, why would I mess around with custom white balance on my camera if I can just shoot RAW and adjust it later? Well, if you correct in camera, you’re going to have a much easier and faster editing session later—especially when shooting silvery or gray subjects or in the open ocean. Why? Because if everything in the image is similar shades of blue, then when you set a target neutral in the software, everything changes, including the water.
Related Reading: Ask a Pro Photographer: How to Capture the Perfect Shot
Setting your custom white balance in the camera so that the subject’s colors are separated from the background will help make your editing session much easier later. I personally also feel that it gives you better colors overall when shooting with natural light.
In regards to color, you’ll also have a few other tools in Lightroom that can help you get those colors looking awesome. The color mixer panel allows you to target specific colors and edit their hue, saturation and luminance. The calibration panel allows you to tweak the Camera Raw's RGB color interpretation for the entire image. You can also utilize the Color Grading panel which allows you to make color adjustments by adjusting the tint of the pixels based on their tone or brightness. For example, adding warmth to the shadows of an image or making the highlights feel colder. Hollywood is a great example of using color grading to create a unique mood and feeling throughout a film.
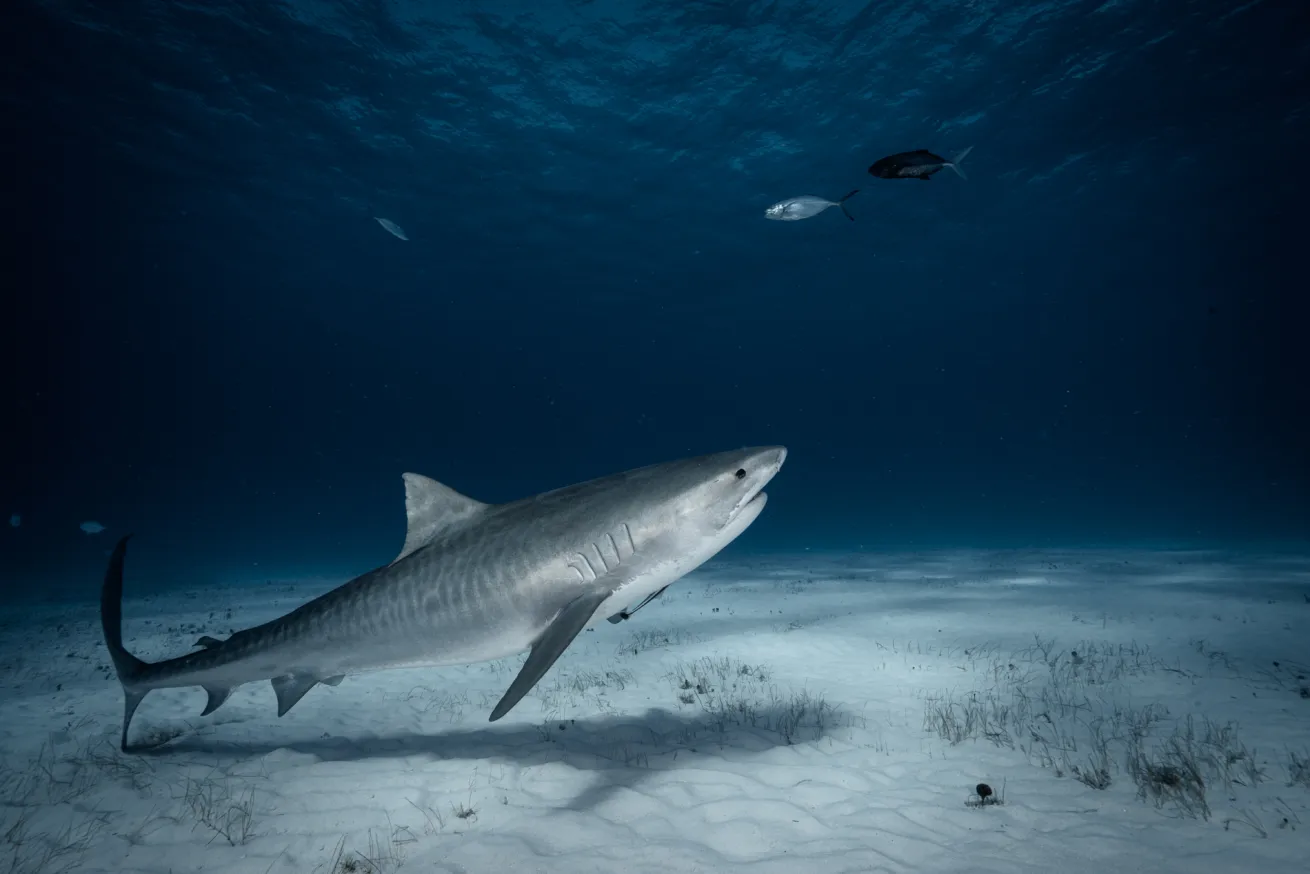
Jay ClueA simple tweak in color can transform the mood of an entire image. Take this tiger shark photo, for instance. Despite being captured in the bright blue waters of the Caribbean, the photo gives off a dark and moody feeling.
Putting it All Together
I know, it’s a lot of information to digest! And we have only touched the tip of the iceberg. So, let’s recap. First, make sure your camera is set to RAW for photos. Then, if you are shooting using only ambient light, utilize the camera’s custom white balance settings to correct color underwater. If you are using lights, then stick with auto white balance or match your white balance temperature to the Kelvin of your lights. Then, in post-processing software, tweak the colors to get them perfect! Big thanks to Alan for sending in this month’s question! I can’t wait to see what questions everyone sends in this month. In the meantime, keep rocking those shots, and I’ll see you next month, ninjas!
Ask a Pro Photographer is a monthly column where Jay Clue answers your questions about underwater photography, cinematography and conservation storytelling. Topics are chosen from our audience. If you have a question you’d like answered in a future Ask a Pro Photographer column, join us on Instagram at @scubadivingmag the last week of each month, or submit your questions using this form.
Cecilia Mar RuizJay Clue
Jay Clue is an accomplished photographer, educator and conservationist who uses captivating photography combined with passionate storytelling to inspire people around the world to cherish and preserve the natural beauty of our planet. His photos have appeared in a multitude of both print and digital media platforms, including Newsweek, National Geographic Traveller, Oceanographic Magazine and many more as well as for major brands such as PADI, Sony, National Oceanic and Atmospheric Association (NOAA) and more. When not working on commercial projects, he shares his passion for photography and conservation by teaching workshops and leading unforgettable experiences with wildlife around the world. Follow him at @jayclue on Facebook and Instagram, where he’s always happy to answer questions and chat about photography.


