Introduction to Manual Underwater Photography
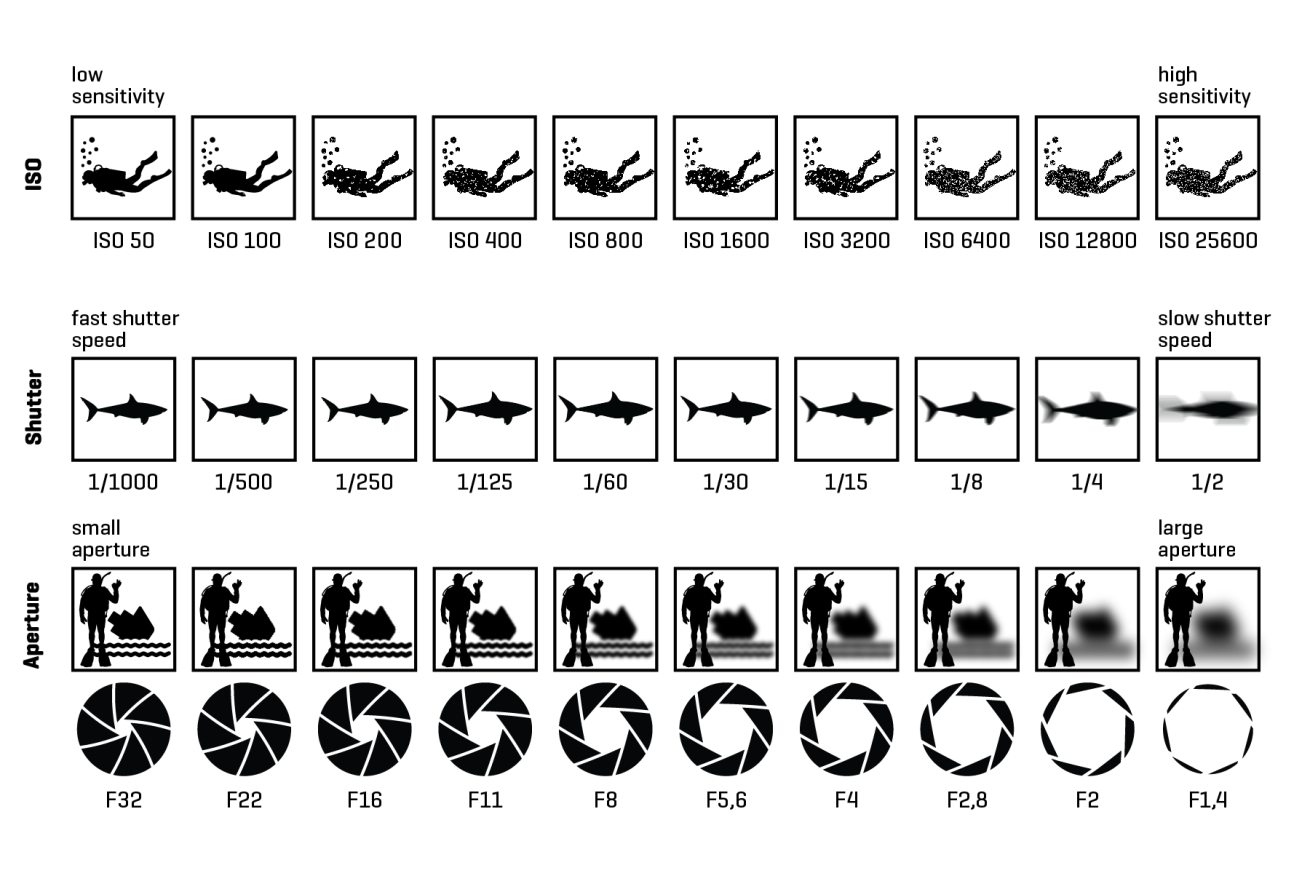
Illustration: Toni Shelley; Shutterstock.com/Oleksii Arseniuk, DreamStockIcons, Zhenyakot and MicekingYou'll want to save this cheat sheet for later.
Welcome to Photographer’s Toolbox, a column about basic photography concepts, gear and techniques you can use to capture exceptional underwater images. Understanding how settings affect your photos can help you get the results you want.
With a basic understanding of camera exposure settings and what they do, you can establish some default settings (“swim settings”) as your starting point for creating photos. Some photographers even tape these to their camera housing. Combining this knowledge allows you to adjust your swim settings to apply creative effects to your images while maintaining perfect exposure.
The three elements that affect photo exposure are commonly referred to as the “exposure triangle”: ISO, aperture and shutter speed. For underwater photography, you also need to consider artificial lighting from video lights or strobes.
Related Reading: Ask a Pro Photographer: How Do You Edit Underwater Photos?
> ISO is the camera sensor’s sensitivity to light. Increasing the ISO creates a brighter photo. However, it introduces grain (aka noise) into the image. While cameras handle higher ISOs well and editing software can help reduce noise, it’s best to keep the ISO under 400.
> Aperture refers to the diameter of the opening that lets light into the camera. A low aperture number (f/2.8) corresponds to a large opening and more light entering the camera. In contrast, a high aperture number (f/22) corresponds to a small opening and less light entering the camera. Beyond exposure, the aperture controls the closest and farthest points that are sharp on either side of the subject in focus. Smaller apertures let in less light buthave a greater depth of field.
> Shutter speed controls how long the curtain blocking the sensor remains open. A slower shutter speed holds the shutter open longer, creating a longer exposure time and letting more light into the camera. The faster the shutter speed, the less time there is for a subject to move in the frame, which is why you see motion blur when using slow shutter speeds with moving subjects.
As you may have guessed, there is a reciprocity between these settings since each contributes to the exposure of a scene. The key to great photography is adjusting the settings to achieve the creative results you want while maintaining accurate exposure.
Related Reading: Mastering the Art of Cephalopod Photography
> Strobes and video lights play an integral part in creating vibrant, high-contrast underwater photos and should be used when subjects are within about 6 feet of the camera.
Related Learning: Digital Underwater Photographer
So, what are “swim settings,” and how do you use the two-step approach to mastering exposure?
Swim settings are basic wide-angle or macro settings for your camera. These settings can be viewed as the starting point for exposing each image and should be reset before every dive so that you have a fresh starting point.
Ideally, you will shoot your first frame with these settings, then use your understanding of the exposure triangle to adjust one variable at a time to dial in exposure and/or achieve the creative effect you desire.