

If they give an award for Best Advice Widely Ignored, a top contender after "Save part of every paycheck" has got to be: "Take time out on every dive to practice safety skills."
Before that C-card is very old, most of us have forgotten our good intentions to, say, practice air sharing frequently or double-check every piece of equipment before every dive.
After all, who does homework after the final exam? Who wastes precious bottom time and air on some silly drill? Not you, and not me either. But I've found seven ways we can all build more safety into our dives and practice some emergency skills without wasting time or air. Best of all, no one will notice!
They're little things, like:
Skill #1: Check tank valves.
You and your buddy have geared up, checked each other in the normal manner and are standing at the entry door. He lifts one leg in a figure 4 to put on a fin, maybe putting a hand on your shoulder for balance.
Sound familiar? Instead, do it this way: When your buddy starts to make that figure 4, grab his tank valve with one hand to steady him, and at the same time check that the valve is fully open. (It's surprising how often divers forget.) With your other hand, you can grab the boat railing for support.
Your buddy can use his other hand to grab your shoulder if he needs to. Then your buddy grabs and checks your tank valve while you put on your fins. This keeps both of you steadier, reminds both of you to open your tank valves fully and wastes no time.
Double-check: Just before you step off, take one deep breath while watching your pressure gauge. The needle shouldn't move at all.
Got the idea? It takes no extra time, effort or air, you do nothing unusual and you both practically eliminate the chance of going in the water with the tank turned off.
How to open a tank valve
You think you know? Maybe not. Many divers were taught to open the valve all the way, then back up a quarter turn. However, this may be a bad idea because it leaves the valve somewhere between fully open and fully closed. If you've accidentally closed the valve then opened it a quarter turn, the reg may breathe at the surface, giving no warning that the valve is nearly closed.
Instead, open the valve all the way until you touch the stop--you don't need to put muscle to it. Now, if you've mistakenly closed the valve instead of opened it, it will be obvious with the first breath or touch of the purge button. Just be sure you take that first breath before you take the first step off the boat. Watch your pressure gauge--it will drop like a stone if the tank valve is accidentally closed.
Skill #2: Double your gauge checks.
Here's a corner a lot of us cut once we get comfortable in the water: we don't check our gauges. By far the most common cause of low-air and out-of-air emergencies is simply the failure to check gauges often.
Regulators do fail, but very rarely. More often, we get absorbed in the dive, use air faster than usual (because we are deep or swimming hard) and fail to notice we're getting low on air.
Do this: Whenever you do think of checking your gauges, signal your buddy to check his. Whenever he thinks of checking his gauges, he should signal you to check yours. Whenever the two of you make eye contact, for whatever reason, let that be a reminder to check gauges. Whenever you notice anyone checking gauges, check yours. These reminders will at least double the number of gauge checks each of you makes.
It costs, maybe, two seconds? And who's going to notice?
How to check gauges
Whenever you check psi, also check depth, bottom time and nitrogen loading--in that order. Making a routine of checking psi first, depth second, time third and nitrogen loading fourth, every time, makes it an effortless habit.
Skill #3: Practice stopping your ascent.
Buoyancy control while ascending is one of those skills many divers never master. As a result, most of us ascend more quickly than the recommended 30 feet per minute. Many divers are unable to control their ascent rate at all in the last 30 feet, when a slow ascent is most important.
The leading reason: Many divers fail to establish neutral buoyancy before they begin their ascents. They start ascending while positive and chase neutral buoyancy, unsuccessfully, all the way up. "Often," says scuba instructor trainer Tec Clark, "they go directly from the exploration phase of their dive to the ascent to the safety stop, without transitions between, where they might regroup and establish control over their buoyancy."
Do this instead:
Stop before you begin your ascent. When you reach the agreed time or psi to begin your ascent, make buddy contact and check gauges. Establish neutral buoyancy. Check each other's gear. Make sure cameras, lights, etc. are clipped in or otherwise put away.
Monitor your ascent rate--and your buddy's. As you both begin to ascend, monitor your own ascent rate indicator and use it to control not only your rate but your buddy's as well. If he starts rising above you, tug his fin or BC as a gentle reminder to slow down. Your buddy should do the same for you, which means two pairs of eyes are watching ascent rates and the slowest diver controls the ascent.
Stop again at 30 feet. A brief stop at the edge of the crucial offgassing range accomplishes several things: You re-establish neutral buoyancy before entering the zone where buoyancy changes most rapidly, so you minimize the chance of an uncontrolled ascent; you orient yourself to your surroundings--to other divers and boat traffic. For example, you may see a crowd of divers headed to the safety stop and may want to wait a while to avoid the crowd. And you may reduce your DCS risk. When ascending from depths greater than 60 feet, a brief stop at 30 feet is like a precautionary deco stop or an extra safety stop. It can't hurt, and it might help.
OK, it takes an extra minute. It's worth it.
How to ascend slowly
Get neutral first. Establish neutral buoyancy before you initiate your ascent.
Kick up. Start your ascent by kicking to overcome neutral buoyancy, not by adding air to your BC.
Watch your gauges. Keep your ascent indicator in plain sight. Keep one hand free so you can hold it in front of you for the entire ascent.
Bleed air early and often. Begin bleeding air from your BC as soon as you start up and before your ascent rate becomes too fast. Start dumping air before it becomes apparent that you need to.
Focus on preventing a fast rate, not curing it. If you have to fin gently all the way to the surface to keep ascending, that's fine and safer than a positively buoyant ascent.
Face your buddy as you ascend. By looking over each other's shoulders, you have a 360-degree view of your surroundings.
Skill #4: Practice air sharing.
Illustration by TrevorJohnston.com
Got time to kill on a safety stop? Why not practice air sharing with your buddy?
Instead of staring off into oblivion for the three- to five-minute safety stop, put the time to a good use--practice sharing air with your buddy, by whatever method you've agreed upon before the dive. Repeat the whole drill, as you learned it in class, beginning with the proper signal to your buddy. After you've taken a few breaths and gotten comfortable, give your buddy's air source back and change roles.
Don't cut corners. If you practice the drill the same way every time, you will be able to perform it automatically when you really need it. And look at the silver lining: The whole drill will help you pass the time during the safety stop.
How to Share Air
Step 1: Signal your buddy that you're low on air and want to share.
Step 2: Your buddy moves toward you and offers an air source, either his primary or his secondary depending on his equipment configuration.
Step 3: Put the offered reg in your mouth right side up, purge it, and begin breathing normally.
Step 4: Make physical contact, by grabbing your buddy's arm or BC strap or tank valve, so you don't drift apart and pull the reg from your mouth.
A few cautions, however:
Always review the drill before the dive, so each of you knows which air sources to use.
Watch your buoyancy. Don't become so absorbed in the air-sharing drill that you start ascending.
Inform the divemaster before the dive. If he doesn't know you're practicing, he will assume a real emergency. That may distract his attention from someone who really needs help.
Think twice before practicing "buddy breathing" techniques where both divers share one regulator. Experience has shown this to be a somewhat dangerous procedure unless practiced frequently. If buddy breathing is going to be your air-sharing method, agree on it in advance, think through the steps and practice it "dry" first.
Skill #5: Practice an emergency swimming ascent from 15 feet.
Illustration by TrevorJohnston.com
Nearly your last resort when out of air is to make an emergency swimming ascent, but divers rarely practice it except in certification classes. In fact, some instructors are reluctant to encourage practicing this skill, fearing the practice itself may be dangerous. The risk is that you will lose your head, lose control of your ascent rate or hold your breath while ascending.
But the alternative is to "practice" the emergency swimming ascent only when you really need it--when you're deep, out of air and panicky. By contrast, the ascent from the 15-foot safety stop to the surface is the safest time to practice this skill because you are close to the surface, calm and have air.
Do be careful, however. Keep your regulator in your mouth and keep control of your buoyancy and ascent rate. Essentially, you should be making a normal ascent except that you practice exhaling all the way to the surface.
For more safety, take turns with your buddy. On the first dive, you practice the ascent while your buddy watches for your bubbles and monitors your rate. On the next dive, he practices and you watch him.
How to make an emergency swimming ascent
Step 1: Keep your reg in your mouth. Instead of inhaling, exhale slowly making an "ahhh" sound.
Step 2: Ascend at a normal rate. At 30 feet per minute, you have 30 seconds to reach the surface from 15 feet. This should be ample. In fact, you'll probably find more air in your lungs, not less, as you ascend. If you do run out of air, take another breath rather than rushing the ascent. A safe ascent rate is more important than completing an exercise. Next time, exhale more slowly.
Note:_ This is not an emergency buoyant ascent, which involves dumping weights and ascending as quickly as possible.
_
Skill #6: Practice the tired diver tow.
Remember practicing the tired diver tow in your open-water certification class? Haven't done it since, have you? To practice this useful skill, surface 50 feet or so from the dive platform so you can tow your buddy halfway, then he can tow you. Or, if you surface at the platform because you've been using an ascent line, swim out and back a few yards. In either case, a very short distance is enough. Remember, your goal is to practice, not make yourselves tired. If there is any current at the boat, surface up-current so you don't have to fight it, or surface at the boat and swim up-current first.
OK, other divers will notice you doing this one. Get over it. By the way, the boat crew will notice too. Let them know in advance so no one dives in to "help." That would be real embarrassment.
How to tow a tired diver
Step 1: Inflate both BCs so both divers can relax and breathe surface air if necessary and feel secure. A tired diver is often an anxious diver.
Step 2: Towed diver lies on his back, with legs stretched out.
Step 3: Roll onto your side, parallel to and facing the towed diver, as if swimming a sidestroke.
Step 4: Grab his armpit or hook your arm in his arm.
Step 5: Use short fin strokes to avoid kicking your buddy.
There are three alternative methods of towing a tired diver, including pulling from behind on his tank valve and pushing against his feet. Try them all. Different methods work better in different situations.
Skill #7: Practice ditching weights.
It is dismaying how often a drowned diver is found on the bottom with weights still attached. Panicky divers at the surface often forget to dump weights while struggling for buoyancy.
You may think you know how to dump your weights pretty well because you do it after every dive. But fumbling out of a belt in calm safety is a lot different from ditching weights--quickly and cleanly--in the water during an emergency.
Can you locate the buckle or release without looking or thinking? Can you quickly remove the belt or weights without getting them tangled in your gear?
For practice, do this exercise when the dive boat routine calls for removing your weights before climbing up the ladder: Using only one hand and keeping your eyes on the ladder or the swim step, reach for the buckle or the weight release. Now pull your weights well clear of your body before handing them up.
If you wear a traditional threaded weight belt, grab the loose end of the belt to prevent weights from sliding off.
How to ditch weights
Illustration by TrevorJohnston.com
When removing your weight belt at the end of a dive, practice emergency weight ditching--skill #7.
Step 1: Locate the weight release(s), either the belt buckle or the release handles (usually two).
Step 2: Open the buckle or pull the release handles.
Step 3: Pull the weights away from your body before dropping, so they don't hang up on a fin strap or dive knife, but drop clear.
Should You Be Doing This?
There is, of course, some risk in practicing certain safety drills such as air sharing, diver tows and emergency swimming ascents. It's also important to use common sense. When a Cozumel-style current is ripping and the boat is trying to pick up scattered divers, that's no time to be practicing a tired diver tow. When you're anxious and tired and a strong surge is bouncing you up and down at your safety stop, that's no time to practice air sharing. The point is, these drills are optional. Do them when you're relaxed, conditions are good and you feel like it. Don't make a safety drill a hazard itself.
If they give an award for Best Advice Widely Ignored, a top contender after "Save part of every paycheck" has got to be: "Take time out on every dive to practice safety skills."
Before that C-card is very old, most of us have forgotten our good intentions to, say, practice air sharing frequently or double-check every piece of equipment before every dive.
After all, who does homework after the final exam? Who wastes precious bottom time and air on some silly drill? Not you, and not me either. But I've found seven ways we can all build more safety into our dives and practice some emergency skills without wasting time or air. Best of all, no one will notice!
They're little things, like:
Skill #1: Check tank valves.
You and your buddy have geared up, checked each other in the normal manner and are standing at the entry door. He lifts one leg in a figure 4 to put on a fin, maybe putting a hand on your shoulder for balance.
Sound familiar? Instead, do it this way: When your buddy starts to make that figure 4, grab his tank valve with one hand to steady him, and at the same time check that the valve is fully open. (It's surprising how often divers forget.) With your other hand, you can grab the boat railing for support.
Your buddy can use his other hand to grab your shoulder if he needs to. Then your buddy grabs and checks your tank valve while you put on your fins. This keeps both of you steadier, reminds both of you to open your tank valves fully and wastes no time.
Double-check: Just before you step off, take one deep breath while watching your pressure gauge. The needle shouldn't move at all.
Got the idea? It takes no extra time, effort or air, you do nothing unusual and you both practically eliminate the chance of going in the water with the tank turned off.
How to open a tank valve
You think you know? Maybe not. Many divers were taught to open the valve all the way, then back up a quarter turn. However, this may be a bad idea because it leaves the valve somewhere between fully open and fully closed. If you've accidentally closed the valve then opened it a quarter turn, the reg may breathe at the surface, giving no warning that the valve is nearly closed.
Instead, open the valve all the way until you touch the stop--you don't need to put muscle to it. Now, if you've mistakenly closed the valve instead of opened it, it will be obvious with the first breath or touch of the purge button. Just be sure you take that first breath before you take the first step off the boat. Watch your pressure gauge--it will drop like a stone if the tank valve is accidentally closed.
Skill #2: Double your gauge checks.
Here's a corner a lot of us cut once we get comfortable in the water: we don't check our gauges. By far the most common cause of low-air and out-of-air emergencies is simply the failure to check gauges often.
Regulators do fail, but very rarely. More often, we get absorbed in the dive, use air faster than usual (because we are deep or swimming hard) and fail to notice we're getting low on air.
Do this: Whenever you do think of checking your gauges, signal your buddy to check his. Whenever he thinks of checking his gauges, he should signal you to check yours. Whenever the two of you make eye contact, for whatever reason, let that be a reminder to check gauges. Whenever you notice anyone checking gauges, check yours. These reminders will at least double the number of gauge checks each of you makes.
It costs, maybe, two seconds? And who's going to notice?
How to check gauges
Whenever you check psi, also check depth, bottom time and nitrogen loading--in that order. Making a routine of checking psi first, depth second, time third and nitrogen loading fourth, every time, makes it an effortless habit.
Skill #3: Practice stopping your ascent.
Buoyancy control while ascending is one of those skills many divers never master. As a result, most of us ascend more quickly than the recommended 30 feet per minute. Many divers are unable to control their ascent rate at all in the last 30 feet, when a slow ascent is most important.
The leading reason: Many divers fail to establish neutral buoyancy before they begin their ascents. They start ascending while positive and chase neutral buoyancy, unsuccessfully, all the way up. "Often," says scuba instructor trainer Tec Clark, "they go directly from the exploration phase of their dive to the ascent to the safety stop, without transitions between, where they might regroup and establish control over their buoyancy."
Do this instead:
Stop before you begin your ascent. When you reach the agreed time or psi to begin your ascent, make buddy contact and check gauges. Establish neutral buoyancy. Check each other's gear. Make sure cameras, lights, etc. are clipped in or otherwise put away.
Monitor your ascent rate--and your buddy's. As you both begin to ascend, monitor your own ascent rate indicator and use it to control not only your rate but your buddy's as well. If he starts rising above you, tug his fin or BC as a gentle reminder to slow down. Your buddy should do the same for you, which means two pairs of eyes are watching ascent rates and the slowest diver controls the ascent.
Stop again at 30 feet. A brief stop at the edge of the crucial offgassing range accomplishes several things: You re-establish neutral buoyancy before entering the zone where buoyancy changes most rapidly, so you minimize the chance of an uncontrolled ascent; you orient yourself to your surroundings--to other divers and boat traffic. For example, you may see a crowd of divers headed to the safety stop and may want to wait a while to avoid the crowd. And you may reduce your DCS risk. When ascending from depths greater than 60 feet, a brief stop at 30 feet is like a precautionary deco stop or an extra safety stop. It can't hurt, and it might help.
OK, it takes an extra minute. It's worth it.
How to ascend slowly
Get neutral first. Establish neutral buoyancy before you initiate your ascent.
Kick up. Start your ascent by kicking to overcome neutral buoyancy, not by adding air to your BC.
Watch your gauges. Keep your ascent indicator in plain sight. Keep one hand free so you can hold it in front of you for the entire ascent.
Bleed air early and often. Begin bleeding air from your BC as soon as you start up and before your ascent rate becomes too fast. Start dumping air before it becomes apparent that you need to.
Focus on preventing a fast rate, not curing it. If you have to fin gently all the way to the surface to keep ascending, that's fine and safer than a positively buoyant ascent.
Face your buddy as you ascend. By looking over each other's shoulders, you have a 360-degree view of your surroundings.
Skill #4: Practice air sharing.
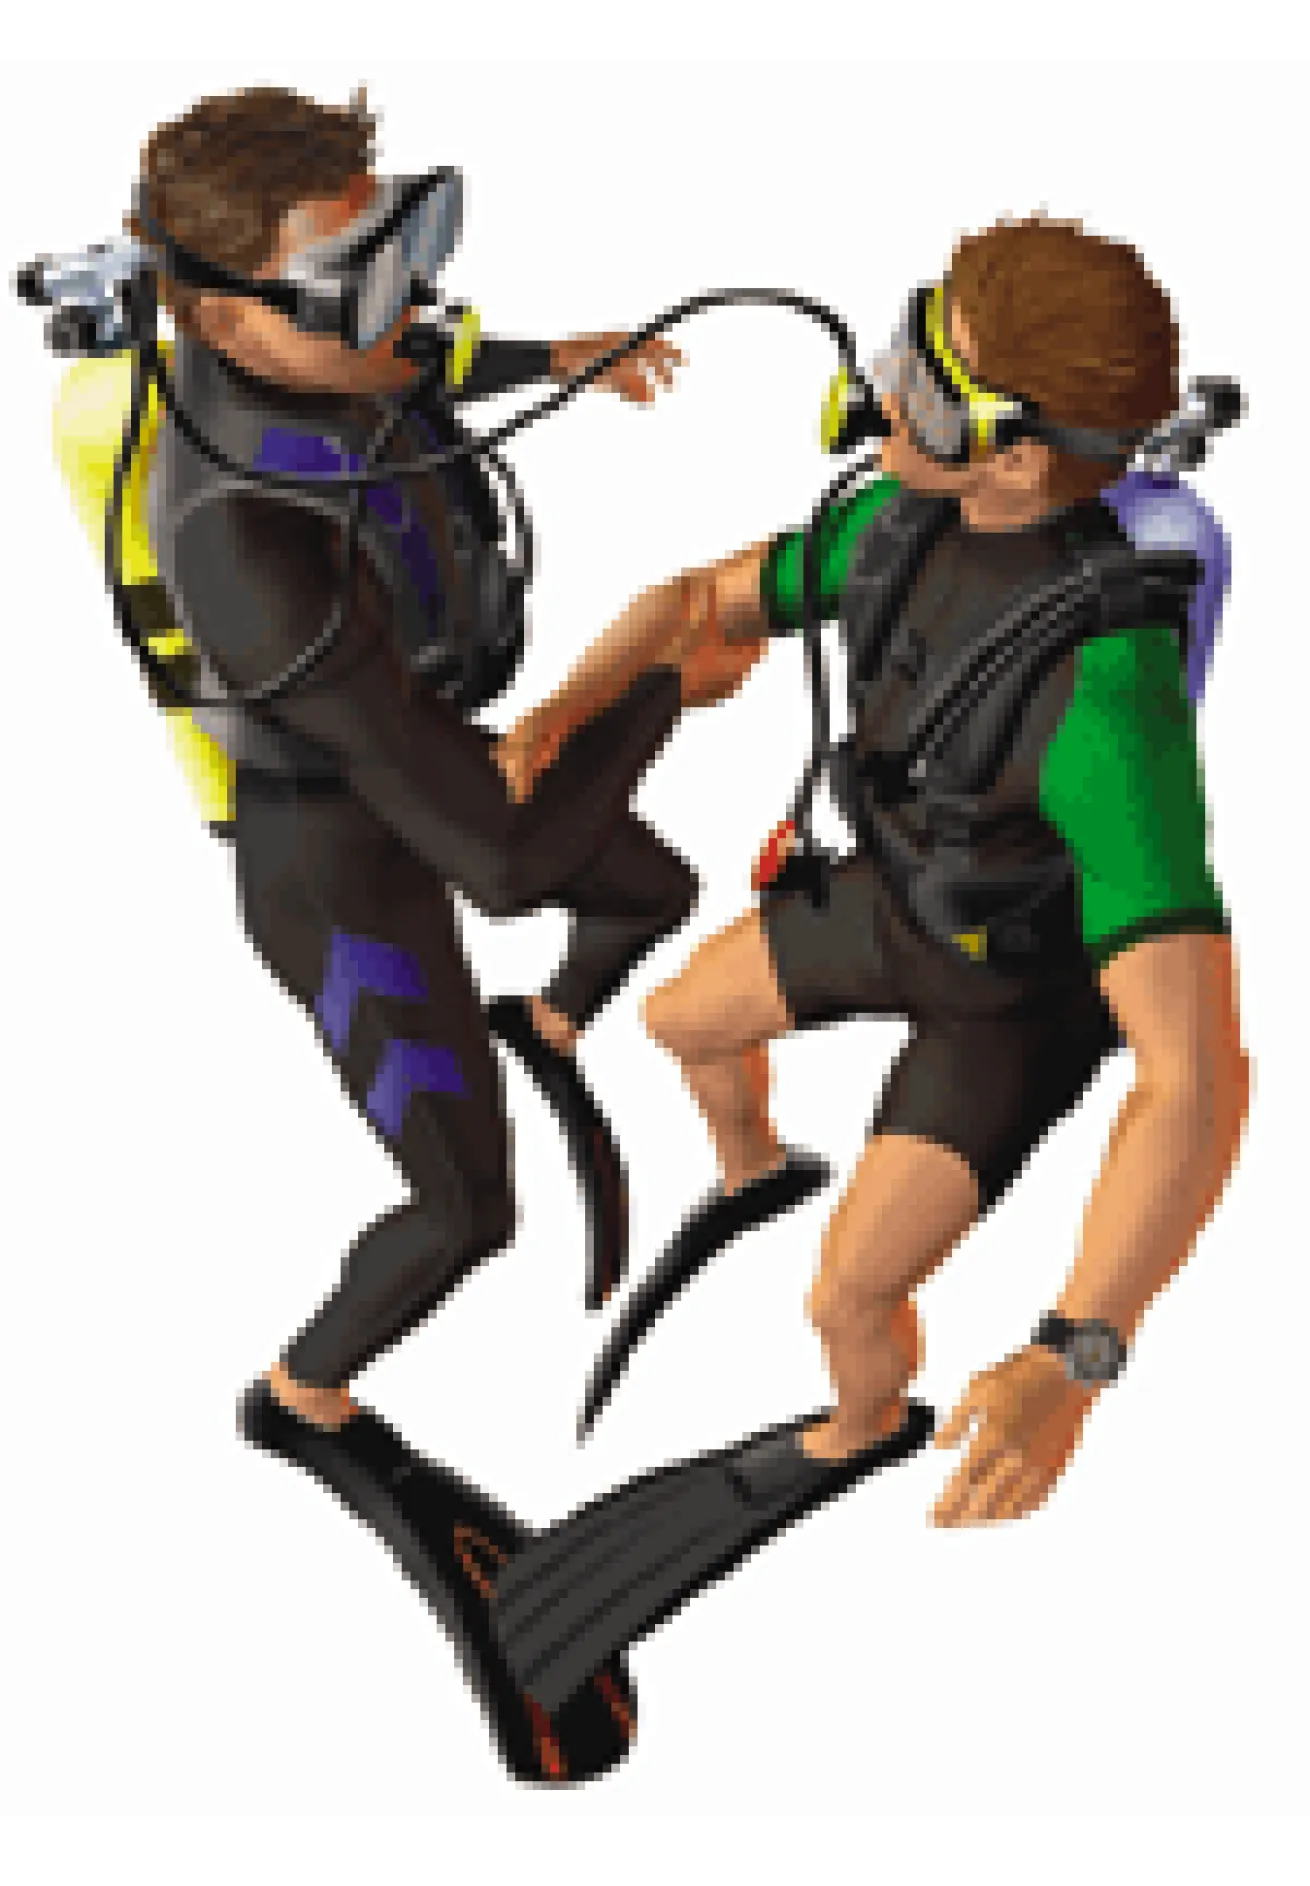
Illustration by TrevorJohnston.com
Got time to kill on a safety stop? Why not practice air sharing with your buddy?
Instead of staring off into oblivion for the three- to five-minute safety stop, put the time to a good use--practice sharing air with your buddy, by whatever method you've agreed upon before the dive. Repeat the whole drill, as you learned it in class, beginning with the proper signal to your buddy. After you've taken a few breaths and gotten comfortable, give your buddy's air source back and change roles.
Don't cut corners. If you practice the drill the same way every time, you will be able to perform it automatically when you really need it. And look at the silver lining: The whole drill will help you pass the time during the safety stop.
How to Share Air
Step 1: Signal your buddy that you're low on air and want to share.
Step 2: Your buddy moves toward you and offers an air source, either his primary or his secondary depending on his equipment configuration.
Step 3: Put the offered reg in your mouth right side up, purge it, and begin breathing normally.
Step 4: Make physical contact, by grabbing your buddy's arm or BC strap or tank valve, so you don't drift apart and pull the reg from your mouth.
A few cautions, however:
Always review the drill before the dive, so each of you knows which air sources to use.
Watch your buoyancy. Don't become so absorbed in the air-sharing drill that you start ascending.
Inform the divemaster before the dive. If he doesn't know you're practicing, he will assume a real emergency. That may distract his attention from someone who really needs help.
Think twice before practicing "buddy breathing" techniques where both divers share one regulator. Experience has shown this to be a somewhat dangerous procedure unless practiced frequently. If buddy breathing is going to be your air-sharing method, agree on it in advance, think through the steps and practice it "dry" first.
Skill #5: Practice an emergency swimming ascent from 15 feet.
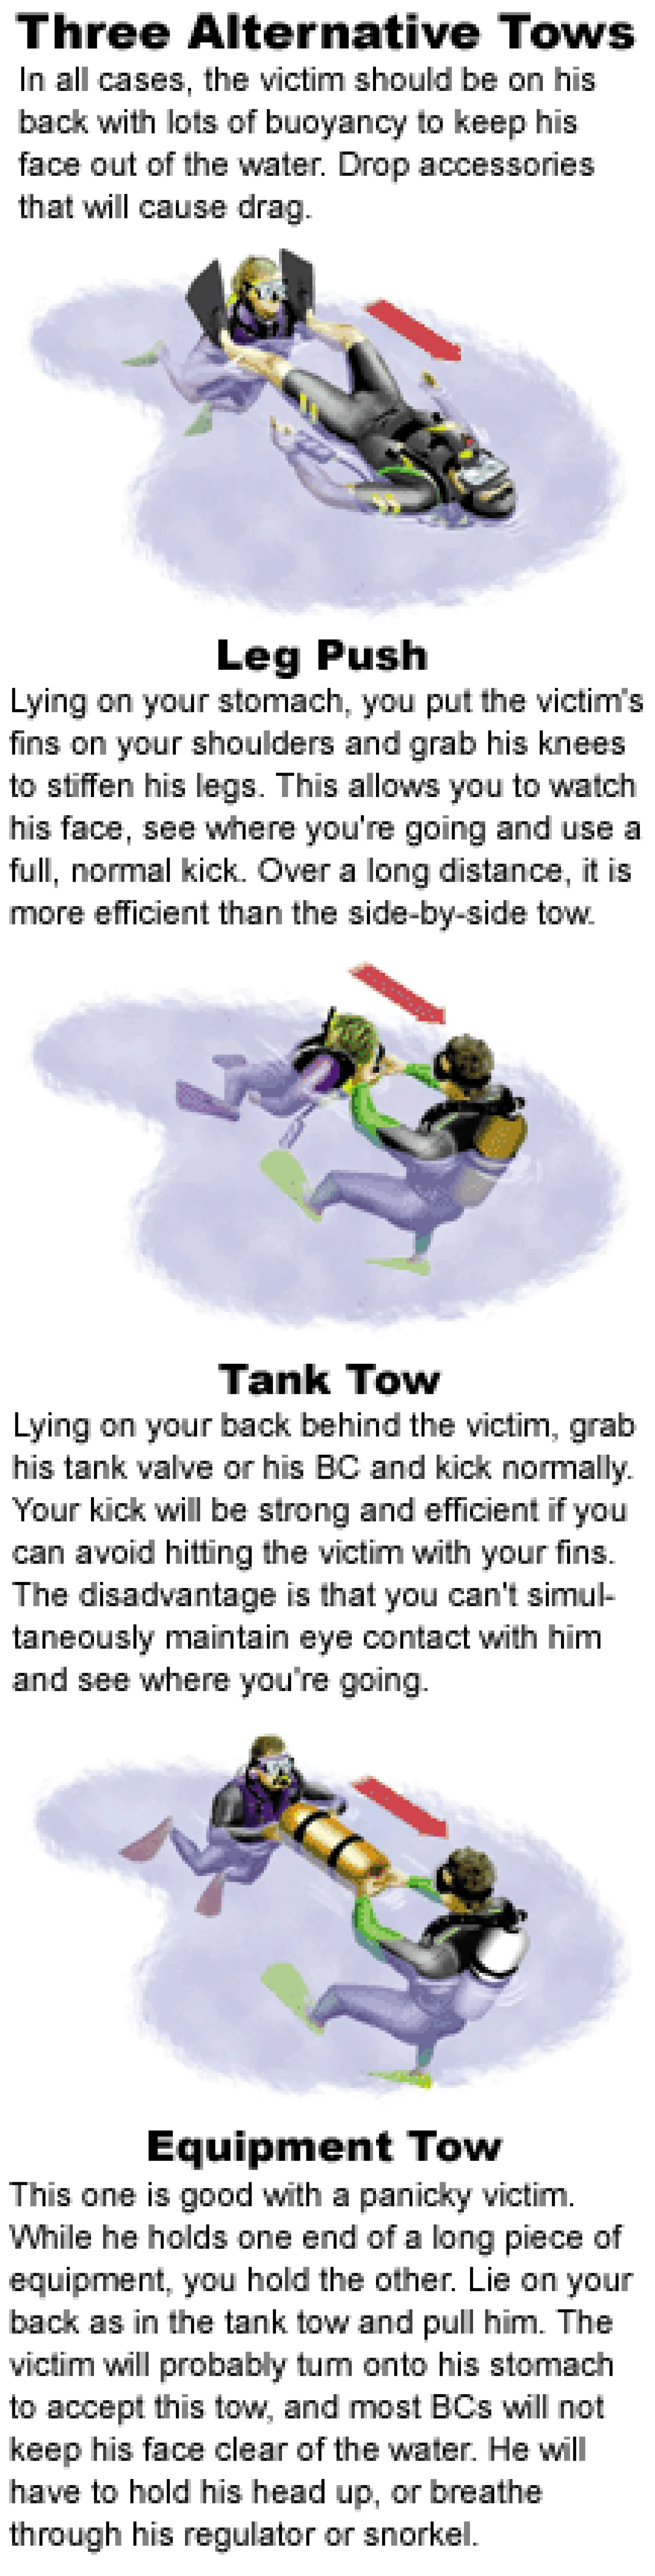
Illustration by TrevorJohnston.com
Nearly your last resort when out of air is to make an emergency swimming ascent, but divers rarely practice it except in certification classes. In fact, some instructors are reluctant to encourage practicing this skill, fearing the practice itself may be dangerous. The risk is that you will lose your head, lose control of your ascent rate or hold your breath while ascending.
But the alternative is to "practice" the emergency swimming ascent only when you really need it--when you're deep, out of air and panicky. By contrast, the ascent from the 15-foot safety stop to the surface is the safest time to practice this skill because you are close to the surface, calm and have air.
Do be careful, however. Keep your regulator in your mouth and keep control of your buoyancy and ascent rate. Essentially, you should be making a normal ascent except that you practice exhaling all the way to the surface.
For more safety, take turns with your buddy. On the first dive, you practice the ascent while your buddy watches for your bubbles and monitors your rate. On the next dive, he practices and you watch him.
How to make an emergency swimming ascent
Step 1: Keep your reg in your mouth. Instead of inhaling, exhale slowly making an "ahhh" sound.
Step 2: Ascend at a normal rate. At 30 feet per minute, you have 30 seconds to reach the surface from 15 feet. This should be ample. In fact, you'll probably find more air in your lungs, not less, as you ascend. If you do run out of air, take another breath rather than rushing the ascent. A safe ascent rate is more important than completing an exercise. Next time, exhale more slowly.
Note:_ This is not an emergency buoyant ascent, which involves dumping weights and ascending as quickly as possible.
_
Skill #6: Practice the tired diver tow.
Remember practicing the tired diver tow in your open-water certification class? Haven't done it since, have you? To practice this useful skill, surface 50 feet or so from the dive platform so you can tow your buddy halfway, then he can tow you. Or, if you surface at the platform because you've been using an ascent line, swim out and back a few yards. In either case, a very short distance is enough. Remember, your goal is to practice, not make yourselves tired. If there is any current at the boat, surface up-current so you don't have to fight it, or surface at the boat and swim up-current first.
OK, other divers will notice you doing this one. Get over it. By the way, the boat crew will notice too. Let them know in advance so no one dives in to "help." That would be real embarrassment.
How to tow a tired diver
Step 1: Inflate both BCs so both divers can relax and breathe surface air if necessary and feel secure. A tired diver is often an anxious diver.
Step 2: Towed diver lies on his back, with legs stretched out.
Step 3: Roll onto your side, parallel to and facing the towed diver, as if swimming a sidestroke.
Step 4: Grab his armpit or hook your arm in his arm.
Step 5: Use short fin strokes to avoid kicking your buddy.
There are three alternative methods of towing a tired diver, including pulling from behind on his tank valve and pushing against his feet. Try them all. Different methods work better in different situations.
Skill #7: Practice ditching weights.
It is dismaying how often a drowned diver is found on the bottom with weights still attached. Panicky divers at the surface often forget to dump weights while struggling for buoyancy.
You may think you know how to dump your weights pretty well because you do it after every dive. But fumbling out of a belt in calm safety is a lot different from ditching weights--quickly and cleanly--in the water during an emergency.
Can you locate the buckle or release without looking or thinking? Can you quickly remove the belt or weights without getting them tangled in your gear?
For practice, do this exercise when the dive boat routine calls for removing your weights before climbing up the ladder: Using only one hand and keeping your eyes on the ladder or the swim step, reach for the buckle or the weight release. Now pull your weights well clear of your body before handing them up.
If you wear a traditional threaded weight belt, grab the loose end of the belt to prevent weights from sliding off.
How to ditch weights
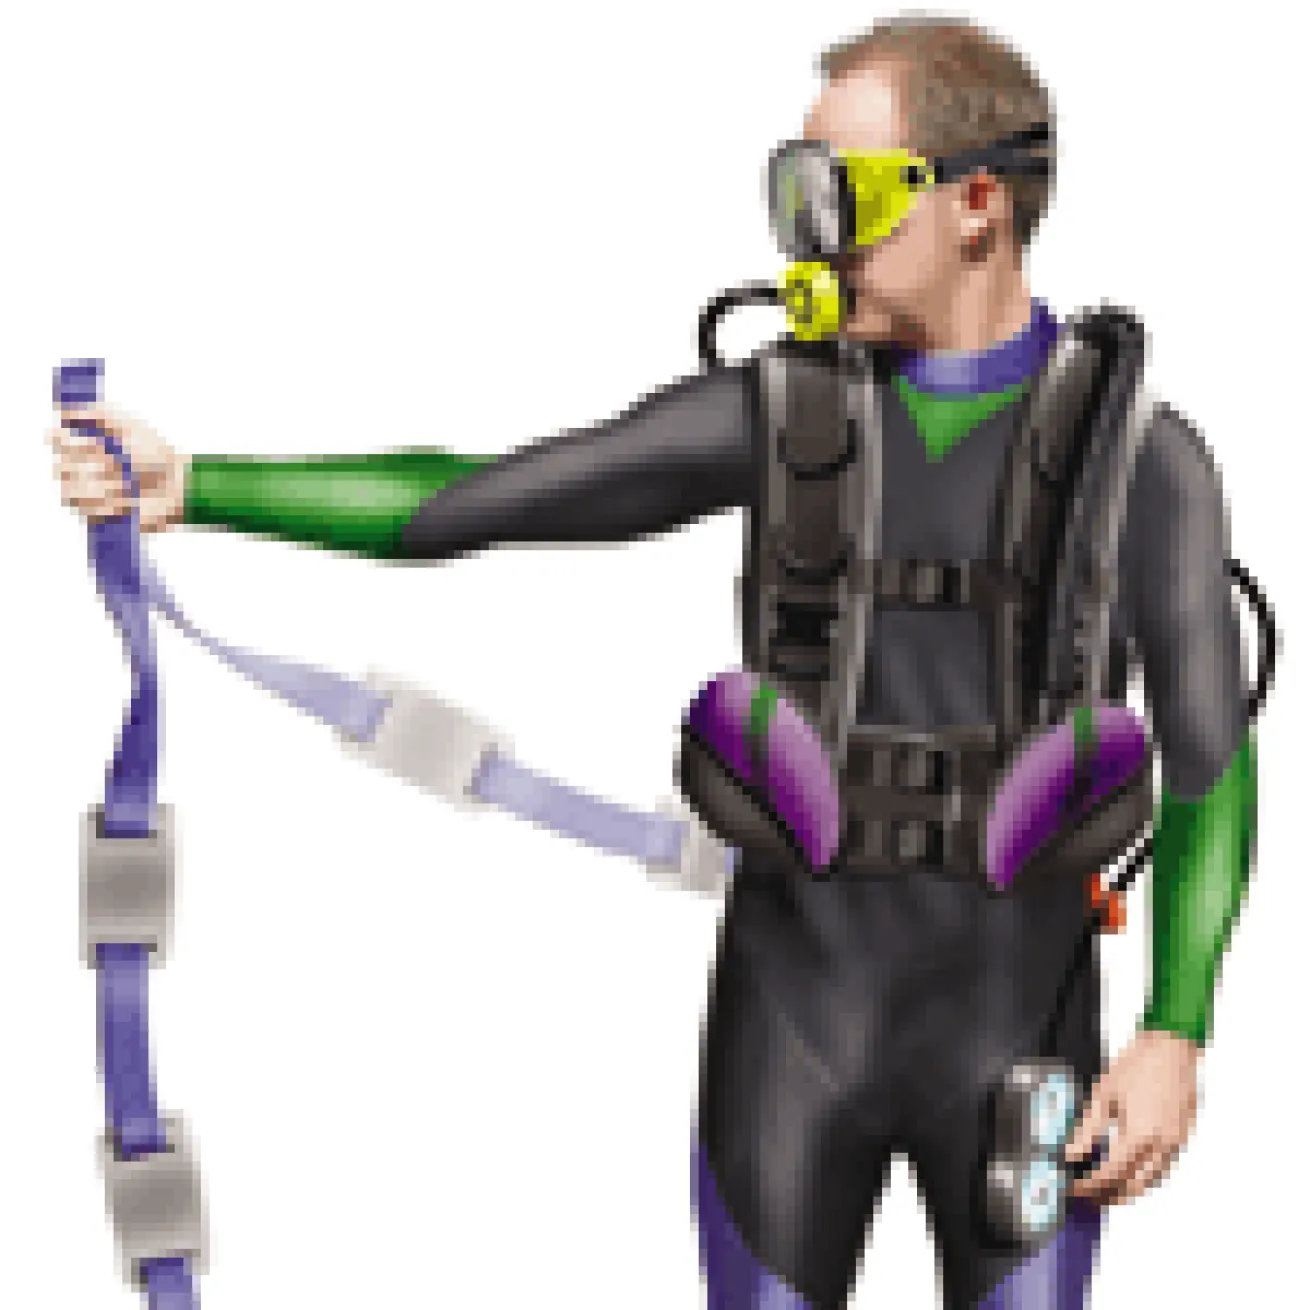
Illustration by TrevorJohnston.com
When removing your weight belt at the end of a dive, practice emergency weight ditching--skill #7.
Step 1: Locate the weight release(s), either the belt buckle or the release handles (usually two).
Step 2: Open the buckle or pull the release handles.
Step 3: Pull the weights away from your body before dropping, so they don't hang up on a fin strap or dive knife, but drop clear.
Should You Be Doing This?
There is, of course, some risk in practicing certain safety drills such as air sharing, diver tows and emergency swimming ascents. It's also important to use common sense. When a Cozumel-style current is ripping and the boat is trying to pick up scattered divers, that's no time to be practicing a tired diver tow. When you're anxious and tired and a strong surge is bouncing you up and down at your safety stop, that's no time to practice air sharing. The point is, these drills are optional. Do them when you're relaxed, conditions are good and you feel like it. Don't make a safety drill a hazard itself.


