


Erin QuigleyPre-trip digital prep means you’ll shoot more and troubleshoot less.
There’s nothing worse than discovering you’re missing a critical piece of gear on a long-awaited dive adventure. Most underwater photographers stress out before a trip, checking and rechecking their equipment to make sure all the required bits and pieces are packed and in working order, but they often forget to prepare their postproduction arsenals as diligently. This checklist will help make the digital side of your trip run smoothly, so you can spend more time shooting and less time troubleshooting.
Laptop in good working order, with minimum 80GB empty space. Keep your images/videos on external drives to keep your laptop’s internal drive free of clutter and running optimally.
Lightroom, Photoshop, Premiere, Final Cut, Word — any software you use regularly — updated and tested. Few exotic destinations provide enough internet bandwidth to update software. To run a test before traveling, disconnect from Wi-Fi and launch your editing software to make sure it functions without a connection to the cloud.
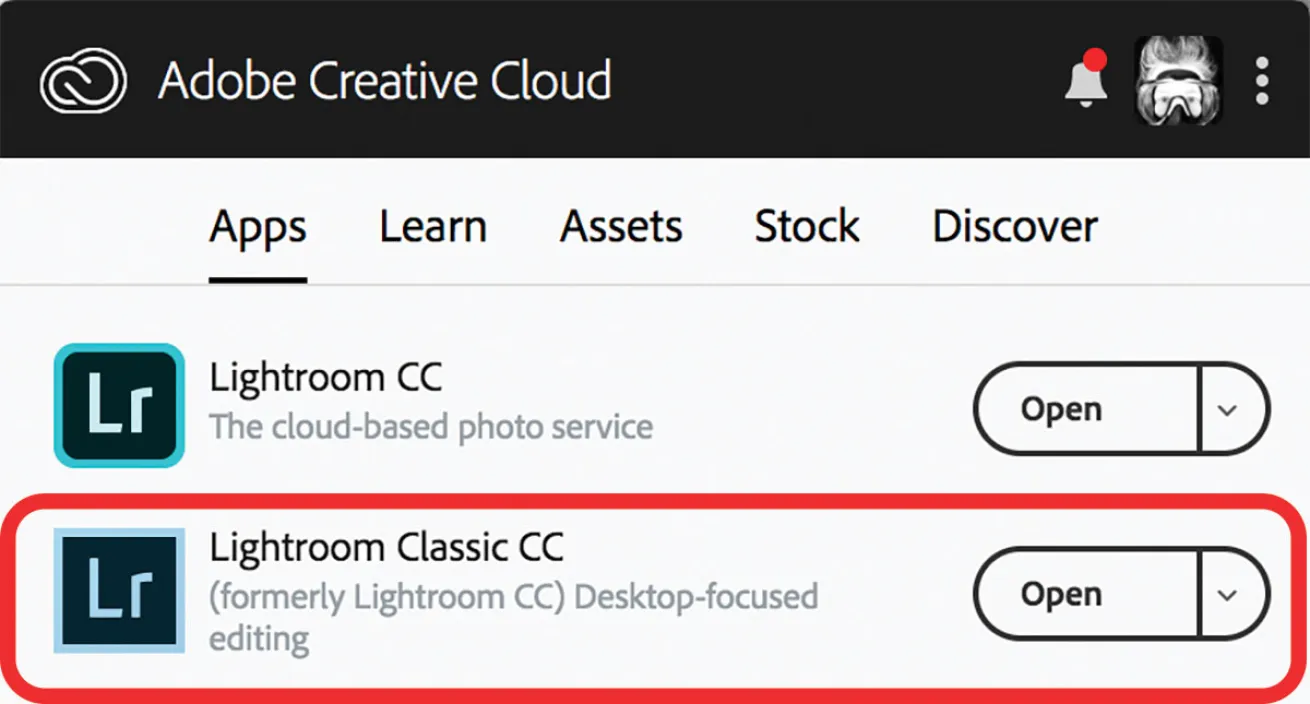
- Do you have the correct version of Lightroom? Adobe’s last big update to the Creative Cloud launched with two different versions of Lightroom. Confusingly, the old version was given a new name (Lightroom Classic CC), and the new version inherited the name of the older software (Lightroom CC). Lightroom Classic CC is the familiar, desktop-focused version of Lightroom. You definitely want Classic if you’re traveling off the grid. The new Lightroom CC is cloud-centric, optimized for connectivity between devices and the cloud, and requires a good handshake with Adobe’s cloud server for full functionality.
Erin QuigleyFigure 1.
Check cables, power adapters, hubs and dongles. Hook up the hardware components of your editing system and double-check that you have enough port availability and cables to connect everything simultaneously. Bring spares!
At least one, preferably two, external drives for storage and backup. I recommend keeping your photos/videos on a dedicated drive, along with your Lightroom catalog (.lrcat) and Lightroom Previews (.lrdata) files. This modular approach is simple to back up and makes it possible to launch your Lightroom catalog from any computer with the Lightroom application installed and enabled.
At least two, preferably more, media cards, formatted and tested in your camera. Formatting in camera restores the important directory information necessary to maintain healthy media cards. You’ll find a formatting option in your camera’s menu system.
Appropriate media card reader, tested with the laptop and cards you’ll be using on the trip. Media cards and readers are notoriously fussy. If you have an old card reader and a new card, you might find that the reader is unable to recognize it.
Make an Import Preset in Lightroom. Automate settings and run a test import in Lightroom before leaving home to save you a headache in the field.
Hook up the hardware components (drives, card reader, etc.) that you need for your Import workflow.
In Lightroom Classic CC, open the Import module.
Select “Copy” from the top middle section of the module.
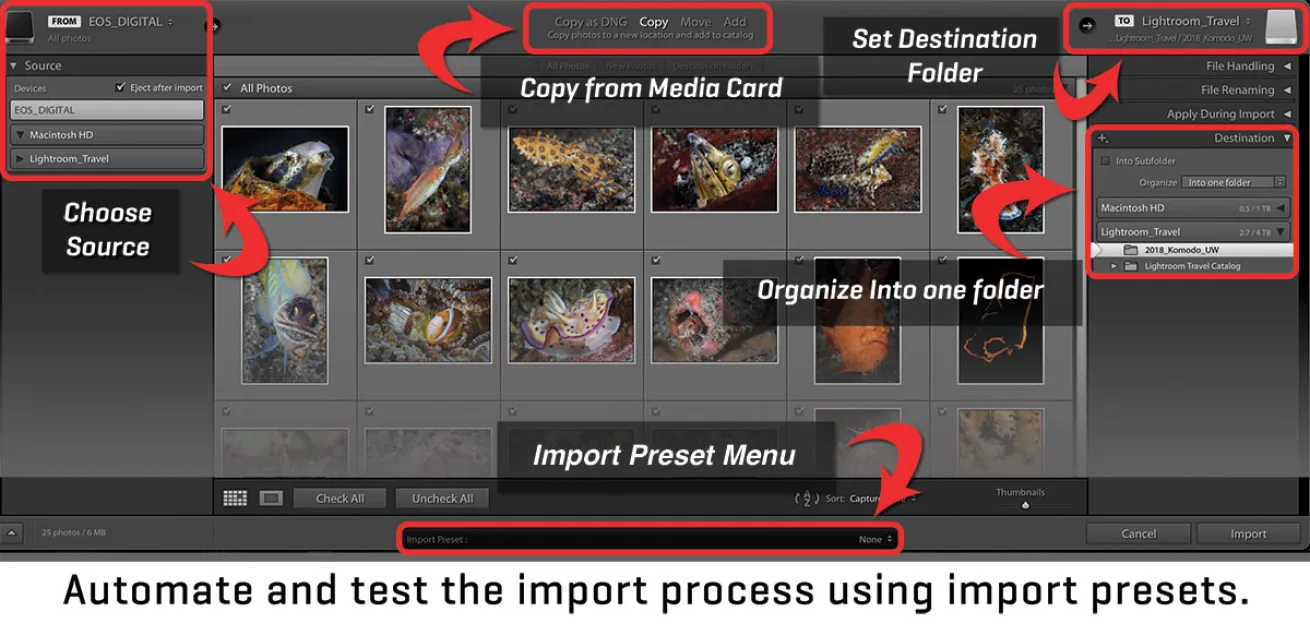
Erin QuigleyFigure 2.
Set the desired destination by clicking on the folder path under the word “To” in the upper right of the Import module. From the ensuing drop-down menu, choose “Other Destination,” and in the browser window, navigate to the folder for your trip. You can create a new destination folder from this browser, if desired.
Set your import preferences in the File Handling, File Renaming and Apply During Import panels along the right side of the Import module.
In the Destination panel at the bottom right of the Import module, make sure the “Into Subfolder” checkbox is unchecked. Choose “Into One Folder” from the “Organize” drop-down menu to avoid Lightroom’s default of date folders. Don’t reset the Destination folder here — you already set it in step 4.
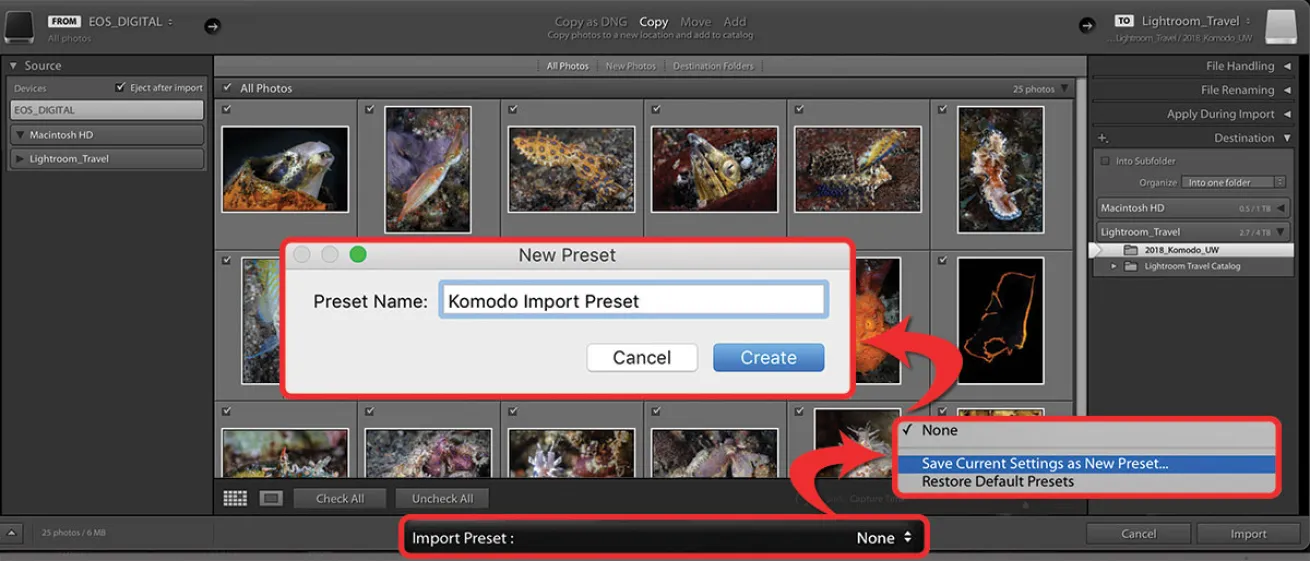
At the very bottom of the Import module, look for the Import preset menu, which by default displays the word “None.”
Click on it, choose “Save Current Settings as New Preset,” and give your preset a name in the ensuing dialogue box (i.e. “Komodo import”).
Erin QuigleyFigure 3.
Close the Import module without importing anything.
Take a few shots on your camera and insert the media card into the reader.
Open the Import module. If you don’t automatically see your test images, select the card from the “Source” panel along the left side of the Import module.
Go to the Import preset menu at the bottom of the Import module and click on the word “None.” Choose the preset you just made and click the “Import” button.
Verify that the test import lands in the desired destination folder.
Once verified, use the new preset for reliable results every time you import.


