

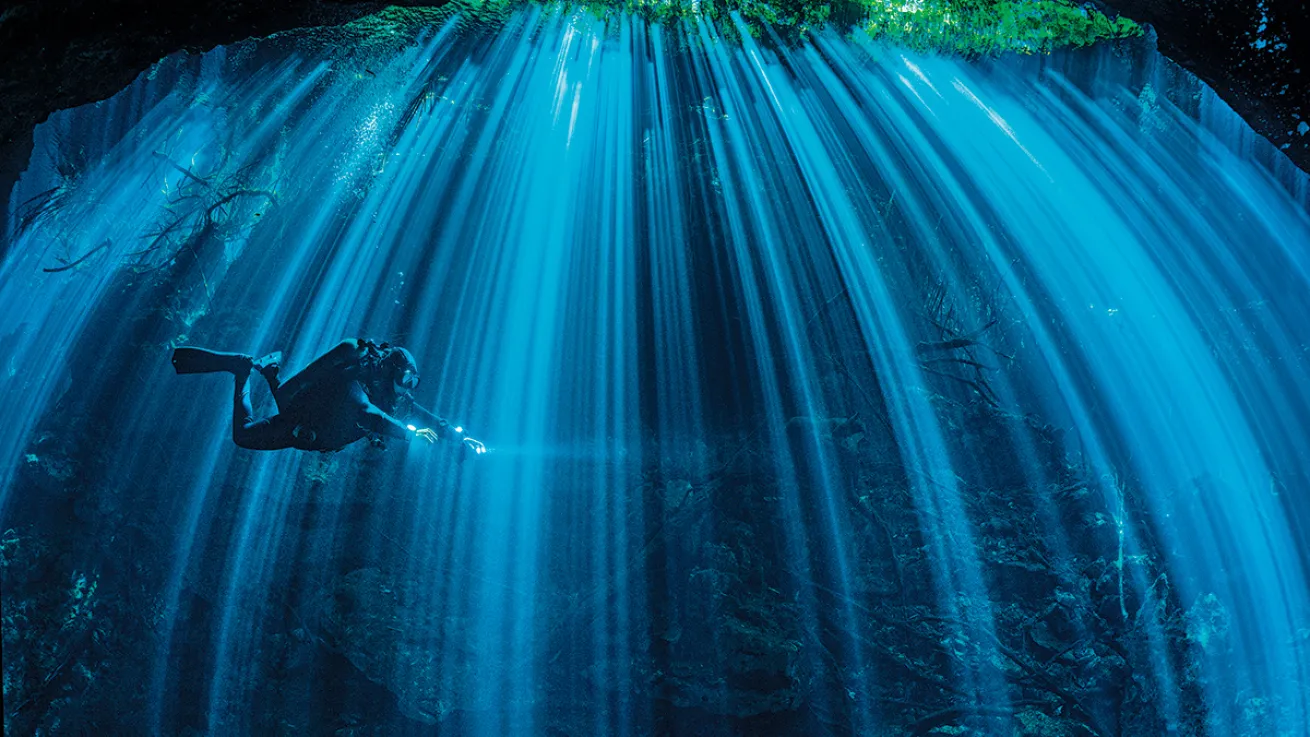
Alex MustardCompose to avoid anything brighter than the beams being in frame.
In fresh water and the ocean, caverns are much loved by underwater photographers for their blend of unique subjects: spearing shafts of sunlight, colorful soft corals and fans, captivating rock formations, and more. And their photographic potential has blossomed in recent years, as each generation of digital cameras rewrites the rules of shooting in dark places. Higher ISOs allow us to create images that just weren’t possible previously.
Tip 1: Master of Darkness
Caverns are dark places, and this creates several challenges for photography, including that photography, by definition, needs light.
First, cameras need light to focus. Focusing might not be the sexiest subject for photographic chat, but it is a fundamental that you must get right because it can’t be fixed in post-processing.
Focus isn’t usually a challenge in wide-angle photography, but that changes in caverns because you use a more open aperture to compensate for the lack of light, so you’re working with much less depth of field than normal. Also, you can’t use a focus light while shooting because it will show up in your high-ISO shots. I use back-button or thumb-focus in caverns; this is a mode on most interchangeable-lens cameras that allows you to decouple the autofocus from the shutter release and assign it to a button you press with your right thumb. This means you can focus carefully with your light on and then leave it locked in place when you turn it off to shoot.
The big problem of darkness is exposure because you have to dial in settings that are way beyond normal use. Before your cavern dive, look for photos you like from other photographers and check their settings, which will be a good starting point. Sadly there are no magic numbers — light levels are changeable, and the best combination of aperture, shutter speed and ISO depends on your type of camera. For example, newer cameras can be pushed to higher ISO values than older ones, and many mirrorless cameras have built-in image stabilizers that allow slower shutter speeds.
The best two tips are: Think about your settings and your camera’s capabilities predive, rather than trying to make a call underwater. And compromise a little on aperture, shutter speed and ISO rather than a lot on any one of them.
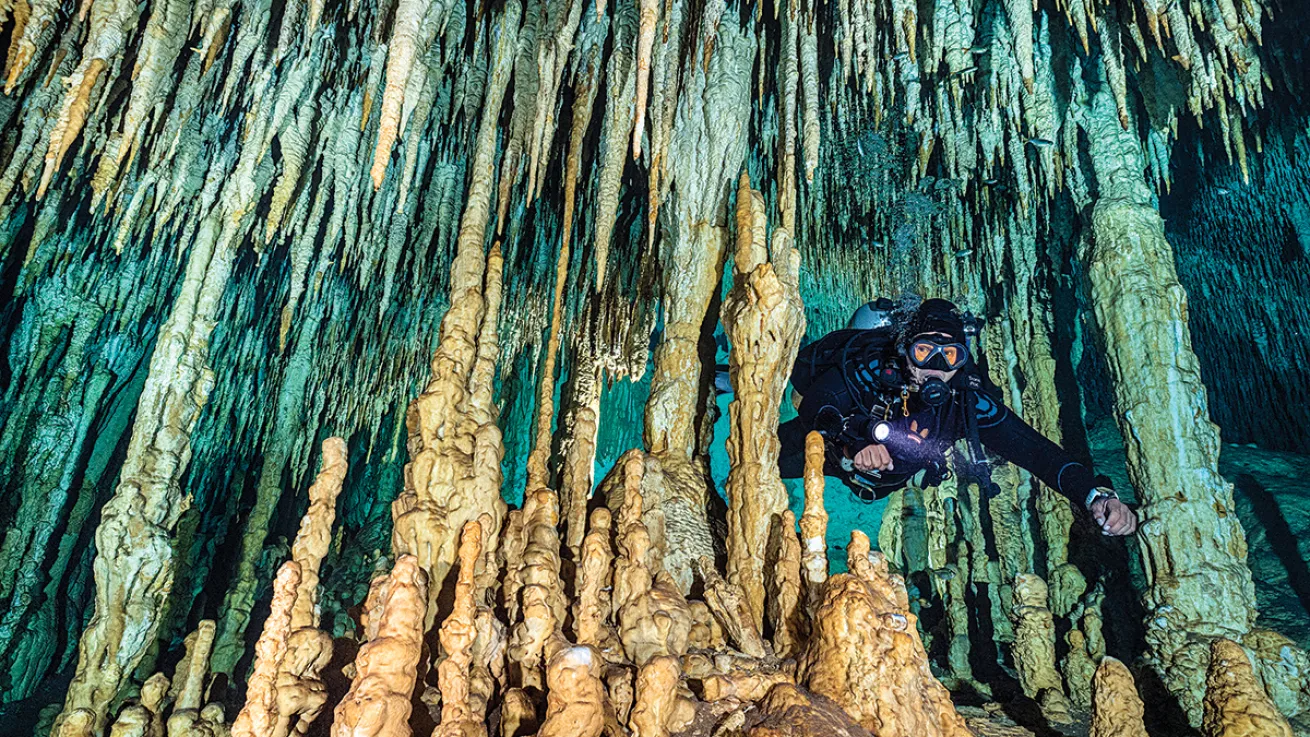
Alex MustardPreset your focus to make it easier for your camera in the dark.
Finally, darkness also makes it tricky to judge exposures because your LCD screen looks much brighter than normal. A bright screen causes us to underexpose photos. Normally you could just tweak them in Lightroom, but this causes problems in cavern shots because you use high ISOs, and your files quickly become very noisy when you make adjustments. Therefore it’s especially important to try to get correct exposures in caverns — I leave a correctly exposed, above-water photo on my memory card to use for comparison to ensure I am exposing correctly.
Tip 2: Laser Brain
Many caverns have openings in their ceilings that let in beautiful sunbeams that make stunning subjects. The calmer the water, the more tightly focused the beams will be. Also many caverns have specific times of day when the beams look best, usually close to noon, when the sun is highest.
Alex MustardShoot from the dark to the light to give images visual depth.
The first tip for capturing these beams is to position yourself correctly: You can’t shoot them if you are in them, so swim into the dark and face back to the light. Now swim so the beam is the brightest subject in your composition. The surface will almost always be brighter than the beam, so make sure the camera can’t see it. I often move close to the ceiling of the cave to close off the view to the surface. Once the beam is the brightest subject in your composition, you can adjust your exposure settings until it is recorded clearly by the camera. If you underexpose, it won’t show up!
Beams of sunlight look best when they start and finish in the frame, enclosed by dark surroundings. Compose the shot so they run vertically up and down the image, or on a diagonal by tilting the camera. Fisheye lenses can create bendy beams; to minimize the effect, keep them close to the centerline of the frame. A diver posing in the beams looks great, but remember, once they are in the light, they won’t be able to see you or your directions in the dark.


