

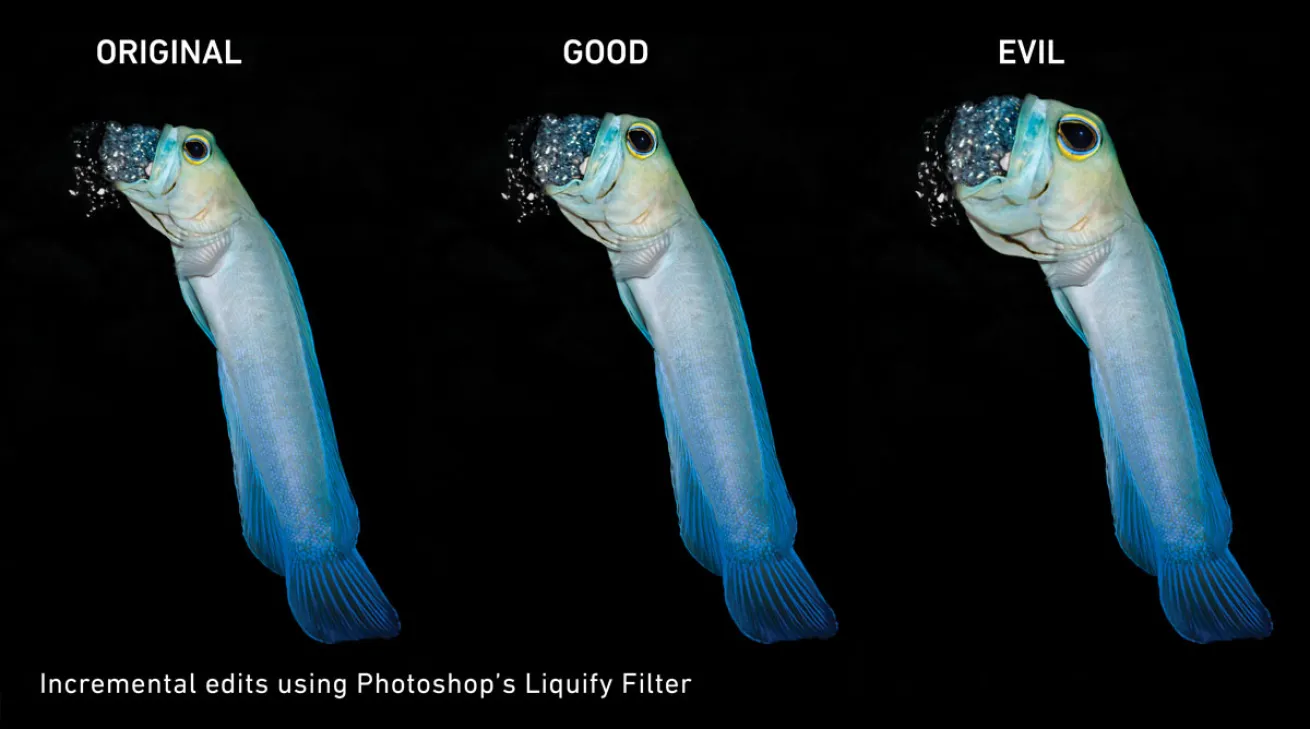
Erin QuigleyIncremental edits using Photoshop's Liquify Filter
The fashion industry has long laid claim to Photoshop’s Liquify filter as its staple of image manipulation. But like many tools in post, it can be used for good or evil. While it’s true there’s no end to the fun that can be had adjusting your buddy’s face or physique in post, the Liquify filter can also be used to nudge, exaggerate or diminish selected features of underwater photos for surprisingly realistic results.
Before we begin, let me add a disclaimer — these aren’t techniques I recommend for everyday use. Use them sparingly, and don’t let Liquify’s mad powers lure you to the dark side.
1 SELECT THE LAYER YOU WANT TO EDIT, AND OPEN THE LIQUIFY PANEL BY CHOOSING FILTER>LIQUIFY FROM PHOTOSHOP’S TOP MENU BAR.
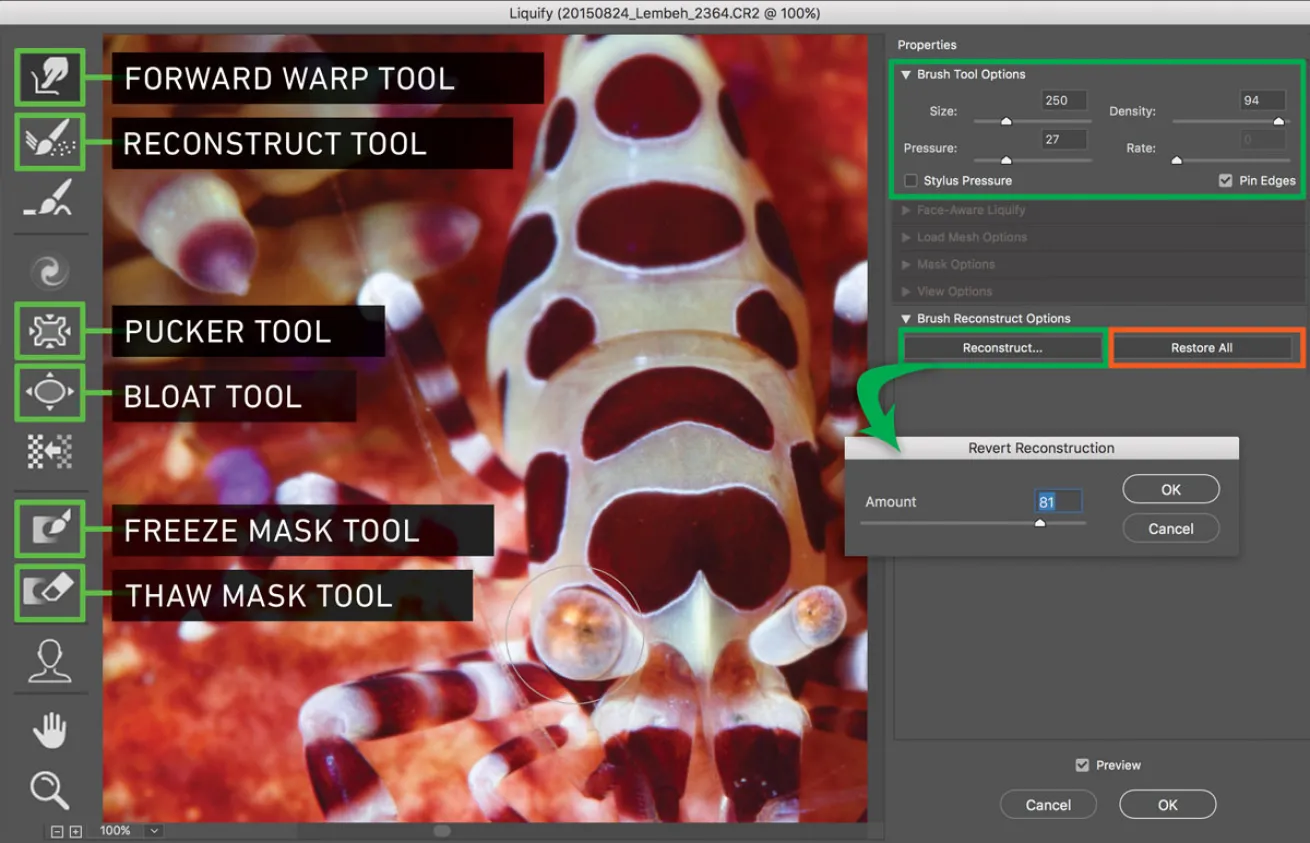
Erin QuigleyLiquify panel
2 ONCE IN THE LIQUIFY PANEL, SET SOME BRUSH OPTIONS.
LIQUIFY BRUSH OPTIONS
>Brush Size
Sets the width of the brush you’ll use to adjust the image. Always select a brush size that’s slightly bigger than you think you’ll need, and change the brush size often. Different parts of the image will need different brush sizes.
> Brush Density
Controls how a brush feathers at the edge. An effect is strongest in the center of the brush and lighter at the edge. Use high density to get more bang for the buck out of the brush.
>Brush Pressure
Sets the speed at which distortions are made when you drag a tool in the preview image. Using a low brush pressure makes changes occur more slowly, so it’s easier to stop them at exactly the right moment.
>Brush Rate
Sets the speed at which adjustments are applied when you keep a tool stationary (click and hold) in the preview image. The higher the setting, the greater the speed at which distortion is applied.
> Stylus Pressure
Uses pressure readings from a stylus tablet. (This option is available only when you are working with a tablet.)
3 BEFORE YOU START TO LIQUIFY, PROTECT ANY AREAS THAT SHOULD REMAIN UNDISTORTED.
PROTECTING SELECTED PIXELS
The Freeze Mask Tool and Thaw Mask Tool work in tandem throughout the Liquify process. You can freeze areas that you don’t want to modify, or thaw frozen areas to make them editable again. By freezing areas of the preview image, you protect those areas from changes. Frozen areas are covered by a red mask that you paint using the Freeze Mask tool. Painting with the Thaw Mask tool unfreezes them.
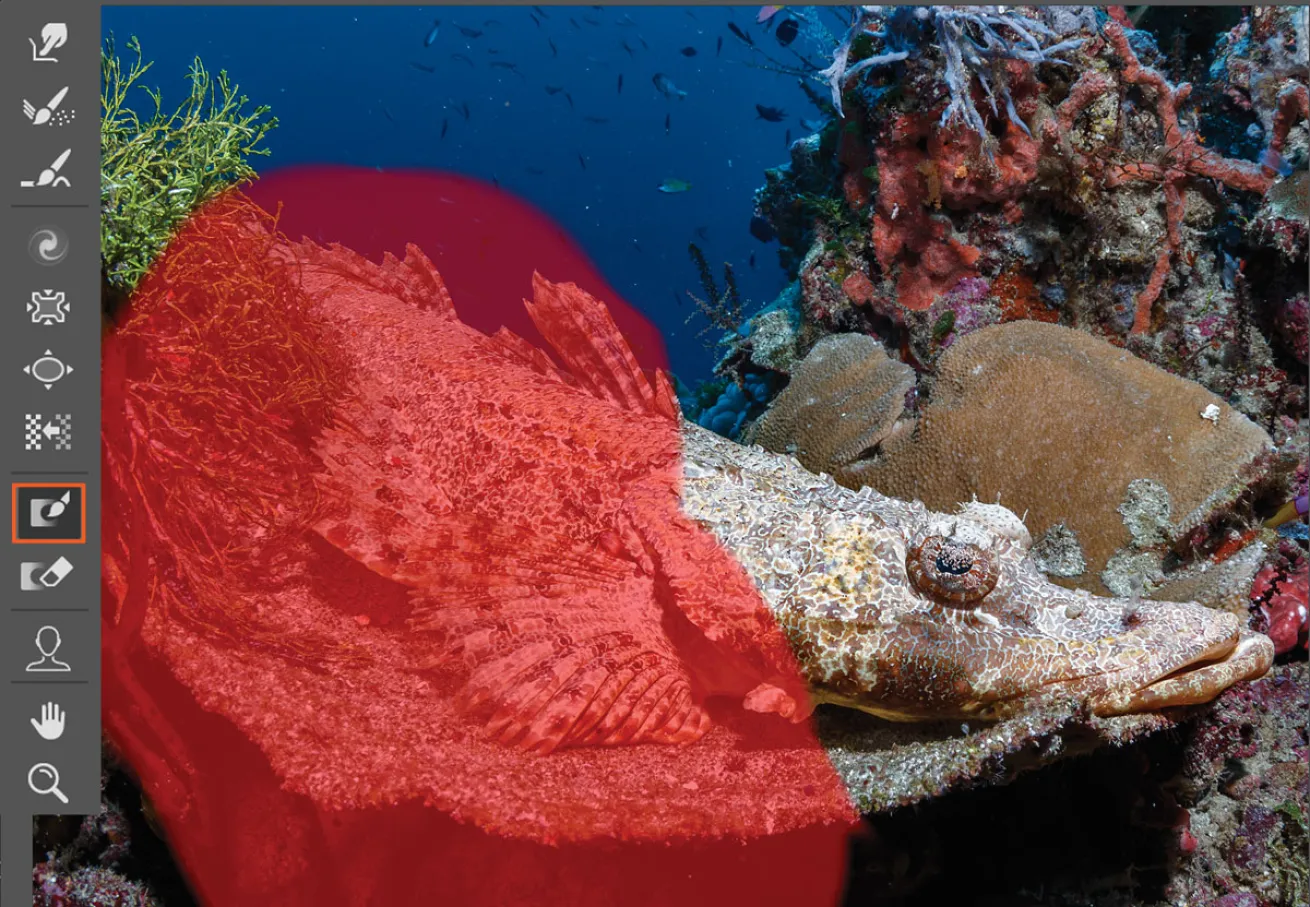
Erin QuigleyFreeze mask tool
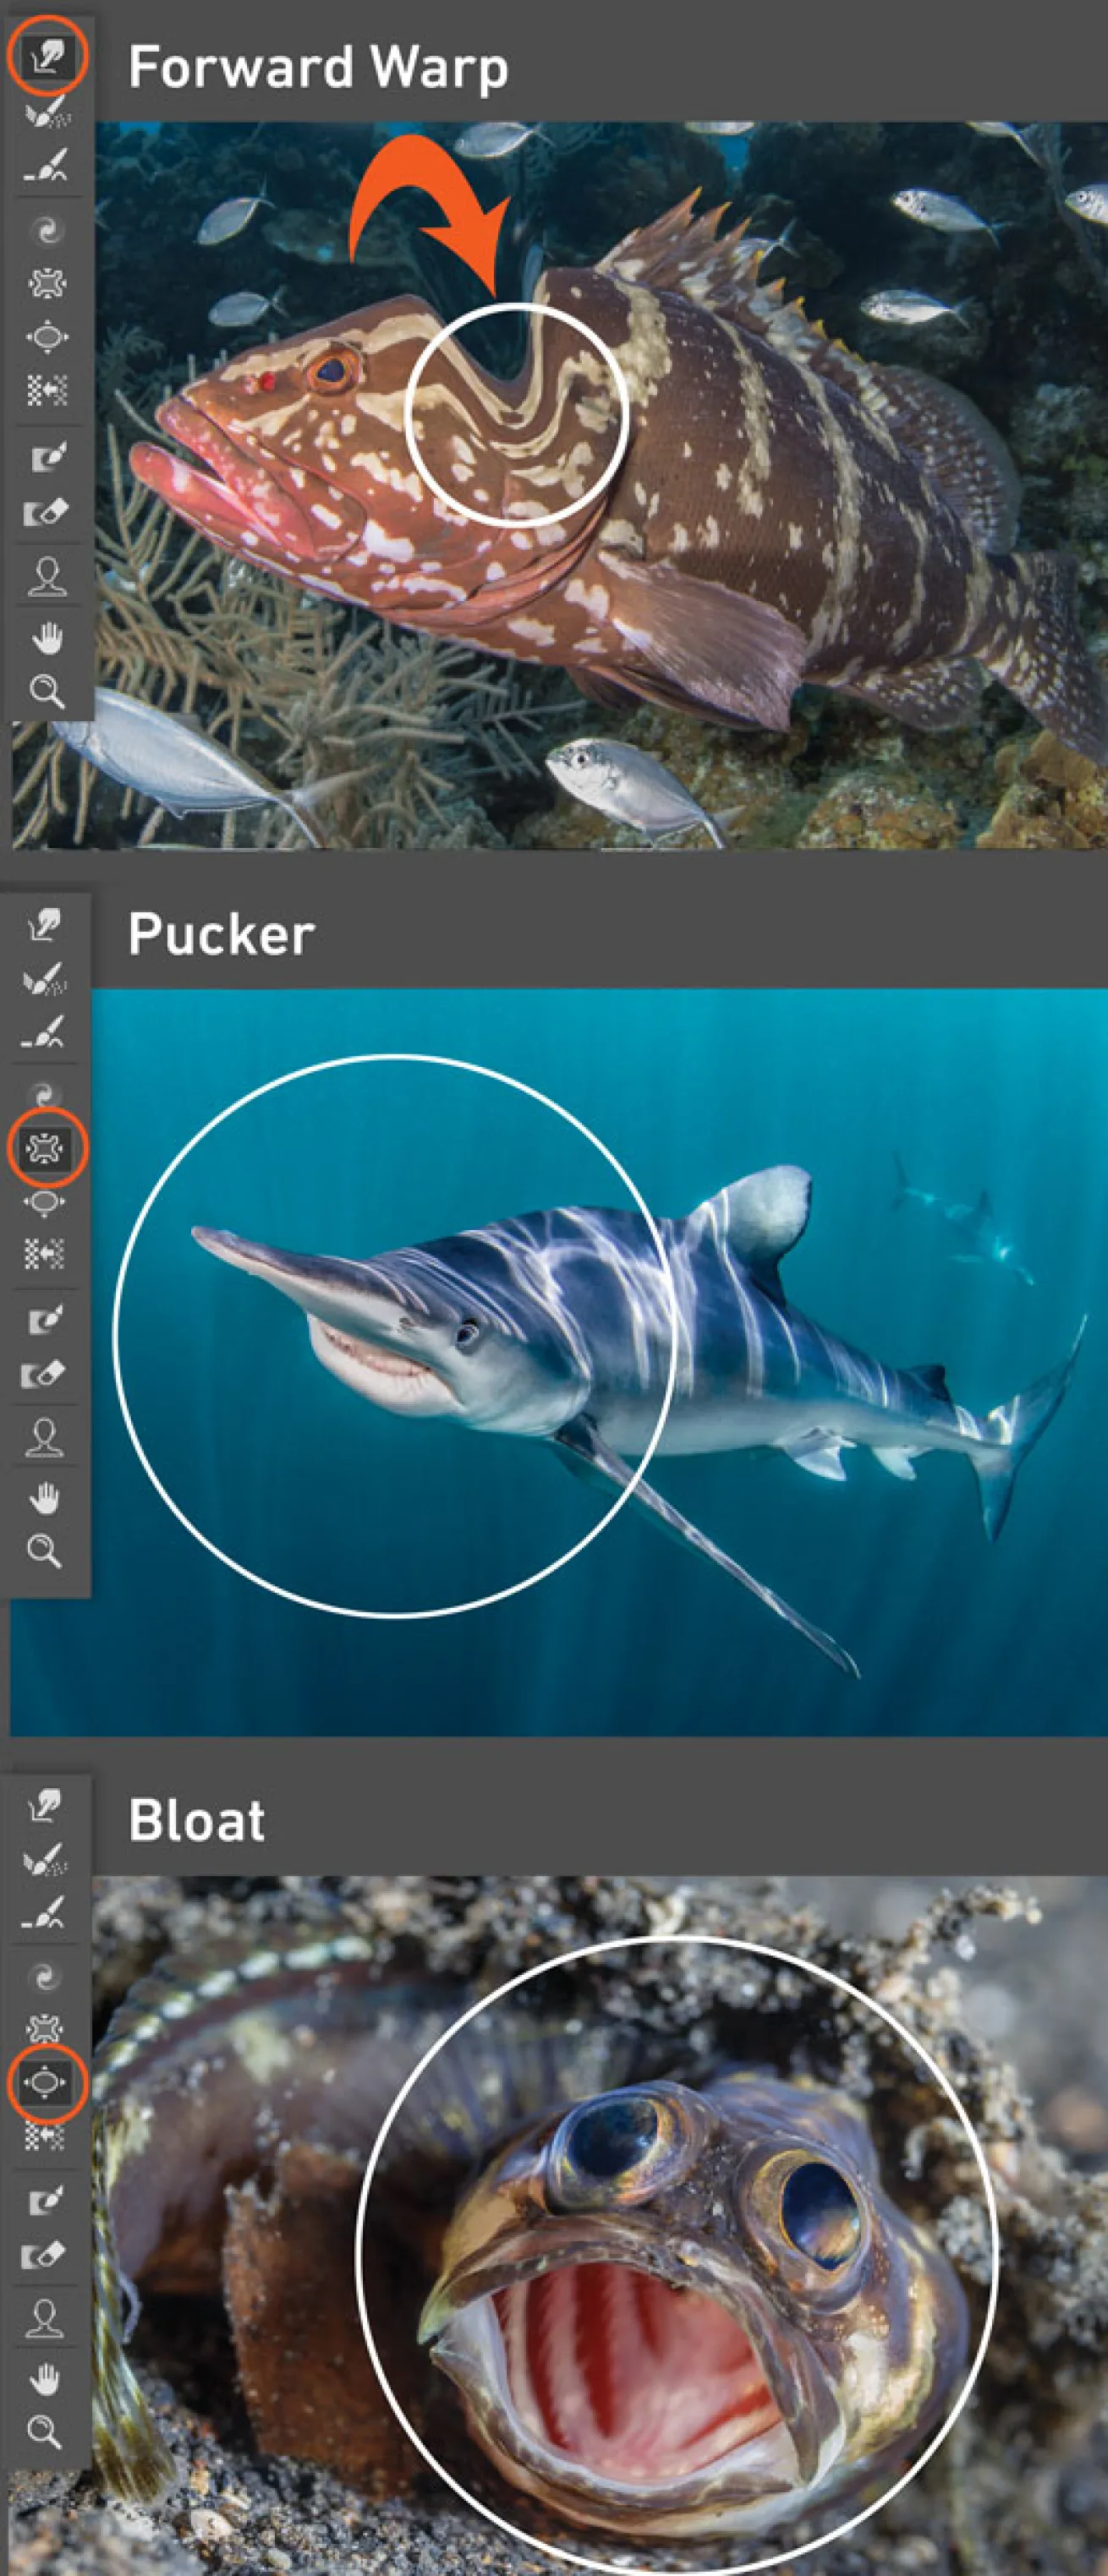
Erin QuigleyNeed-to-know distortion tools
4 LIQUIFY AWAY!
NEED-TO-KNOW DISTORTION TOOLS
Although the Liquify filter offers an array of tools, you really need to know only a few for underwater photography. These tools mash the pixels around, letting you push, pull, pucker or bloat specific areas of your image.
> The Forward Warp Tool
Lets you “fingerpaint” pixels into place, by clicking and dragging in the desired direction. In this shot of a grouper, I’ve used the Forward Warp tool to smoosh a group of pixels inward to demonstrate the effect.
> The Pucker Tool
Sucks pixels inward toward the center of the brush as you click and hold or drag in the desired area of the image. It’s not unusual to get a somewhat comedic “sock puppet” effect when shooting sharks or other large critters close up with a fisheye lens. Since “sock puppet” isn’t exactly the phrase you want springing to mind when looking at sharks, the Pucker tool is a great way to address fish-eye distortion locally (on specific areas of the image).
> The Bloat Tool
Expands pixels outward from the center of the brush as you click and hold or drag in the image. In this jawfish shot, I was able to widen the already open mouth and emphasize the eyes. The Bloat tool is also great for slightly enlarging the eyeballs of critters like shrimp and crabs, where sometimes they’re hard to discern.
5 FINESSE YOUR EDITS USING RECONSTRUCTION TOOLS. LESS IS MORE!
RECONSTRUCTING DISTORTIONS
The Reconstruction Tool reconstructs specific areas of your editing. Brushing over an edit gradually backs off the original intensity.
Clicking the “Reconstruct” button in the Brush Reconstruct Options panel reveals a Revert Reconstruction slider that lets you gradually modify edits across the entire image. Move the slider to the left to incrementally walk back all your edits at once.
Clicking the “Restore All” button in the Brush Reconstruct Options panel completely undoes all changes.
6 CLICK “OK” TO APPLY THE CHANGES, OR “CANCEL” TO EXIT.
PRO TIP
You can sometimes create direct eye contact in an image where the animal is looking just slightly off to the side by using Bloat on one side of the eye, and Pucker on the opposite side. Use the Forward Warp tool to finesse the effect on the edges of the pupil and eye socket.
For more Lightroom and Photoshop tutorials, click here.
Erin Quigley is an Adobe ACE certified digital-imaging consultant and an award-winning shooter. GoAskErin.com provides custom tutorials and one-on-one instruction for the underwater photographic community.


