

A watermark is a faint logo or words superimposed on top of an image. The idea of placing a watermark on your photos is to prevent others from trying to copy and use the photo without permission.

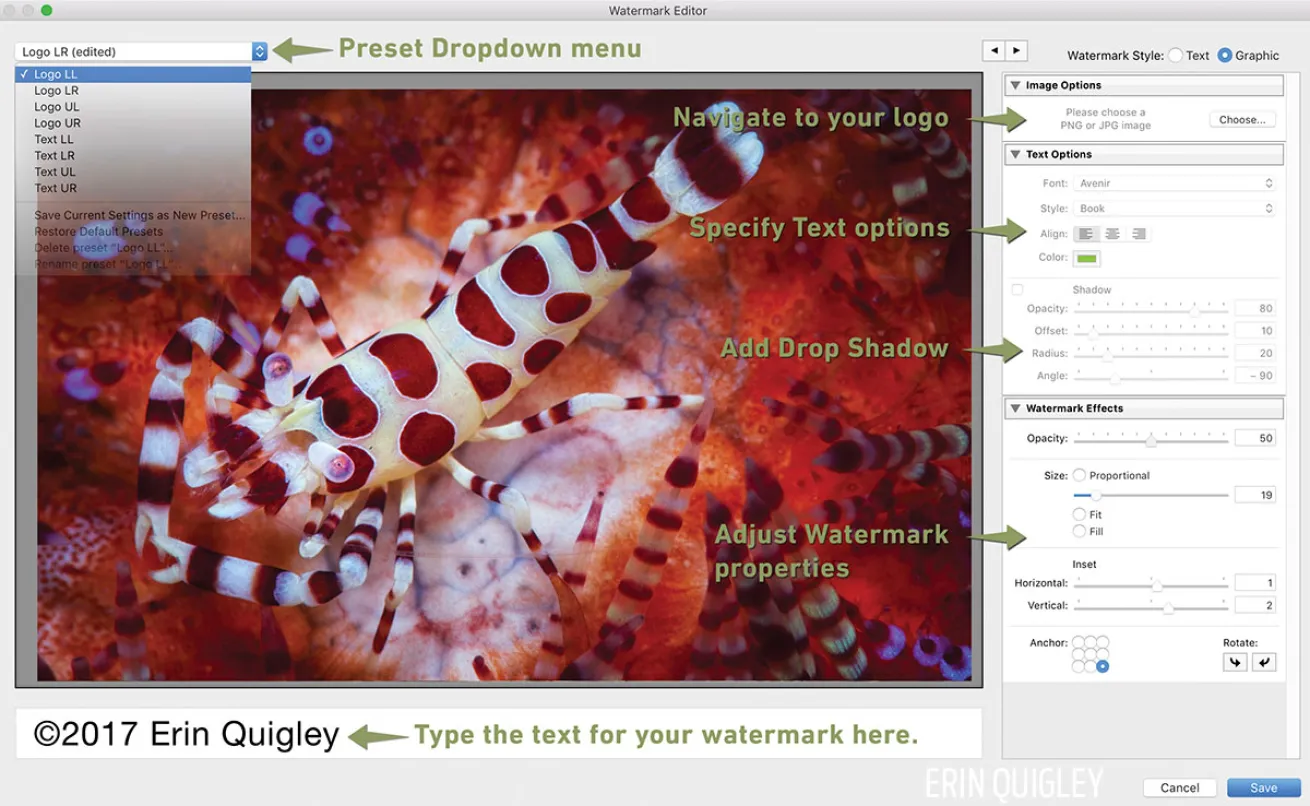
Erin QuigleyHere you will see the difference in a logo watermark and text watermark.
Although a watermark identifies you as the creator of your photo, it won’t stop someone from swiping it, no matter how big or bold you make it. Additionally, if you cover the entire image with a distracting logo, you compromise the shot’s visual impact.
Caveats aside, it’s a good idea to add a watermark to shots you make public, especially if they’re contest winners or iconic photos. Not only does it create a visible record of ownership, but it also helps to establish your brand and presence in the underwater photographic community. Lightroom makes it easy to build watermarks on the fl y, or to save specific watermarks as presets, which can then be applied during the export or printing process.
HOW TO CREATE A WATERMARK IN LIGHTROOM
To launch the Watermark Editor from any module in Lightroom, go to the top menu and select Lightroom>Edit Watermarks… (Mac), or Edit>Edit Watermarks… (PC).
Erin QuigleyHow to create a watermark in Lightroom
To create a text-based watermark, find “Watermark Style:” at the top right of the Watermark Editor panel, and activate the “Text” button.
TEXT EDITOR
Type your watermark text in the text editor box under the preview window.
TEXT OPTIONS PANEL
1) Select your desired Font from the dropdown menu.
2) Select a Style for the font (Regular, Bold, Italic, etc.). Not every font has multiple styles.
3) Choose the alignment for your text. This applies only to lines of text, not to the watermark in the image.
4) Choose your font color by clicking the small, rectangular color icon. There are five different icons at the top of the color-selector box, which toggle various methods for selecting color. I usually stick with the first icon on the left, the RGB color wheel.
Click in the wheel to set the font color. The gradient slider beneath the wheel darkens or brightens the available spectrum.
The currently selected color is displayed in a “swatch” at the bottom of the window. Drag that color to one of the smaller swatches on the right to save it for a future watermark.
The neighboring eyedropper samples color directly from the photo. To match a color from your photo, grab the eyedropper, and click directly on the desired color in your picture.
5) Add a drop shadow if desired.
WATERMARK EFFECTS PANEL
1) Choose the Opacity of your watermark by moving the Opacity slider. A value of 50 or less is best.
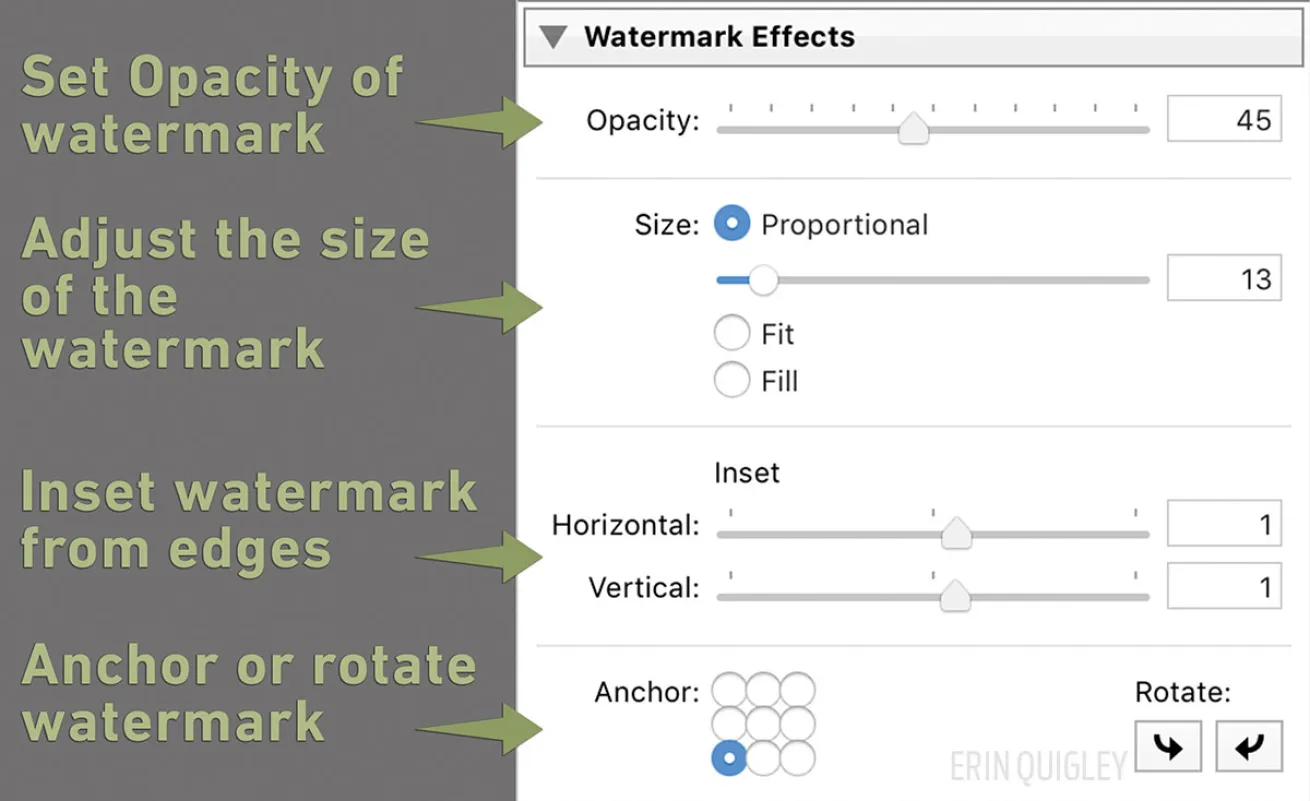
Erin QuigleyWatermark effects panel
2) Adjust the size of your watermark. Either activate the “Proportional” button in the “Size;” section of the panel and adjust the slider below, or click and drag directly on one of the corners of the watermark in the preview window.
3) Click inside the “Anchor:” icon at the bottom left of the Watermark Effects panel to place your watermark at the top, bottom, center, left or right. The nearby “Rotate:” arrows change the orientation of the watermark.
4) Adjust the horizontal and vertical “Inset” sliders so the watermark isn’t mashed against the edge of the photo.
To watermark using a logo or other graphic, find the “Watermark Style:” area at the top right of the Watermark Editor, and activate the “Graphic” button. Alternatively, click on the “Choose” button in the Image Option section of the Watermark Editor. In the ensuing browser, navigate to the desired PNG or JPG logo image.
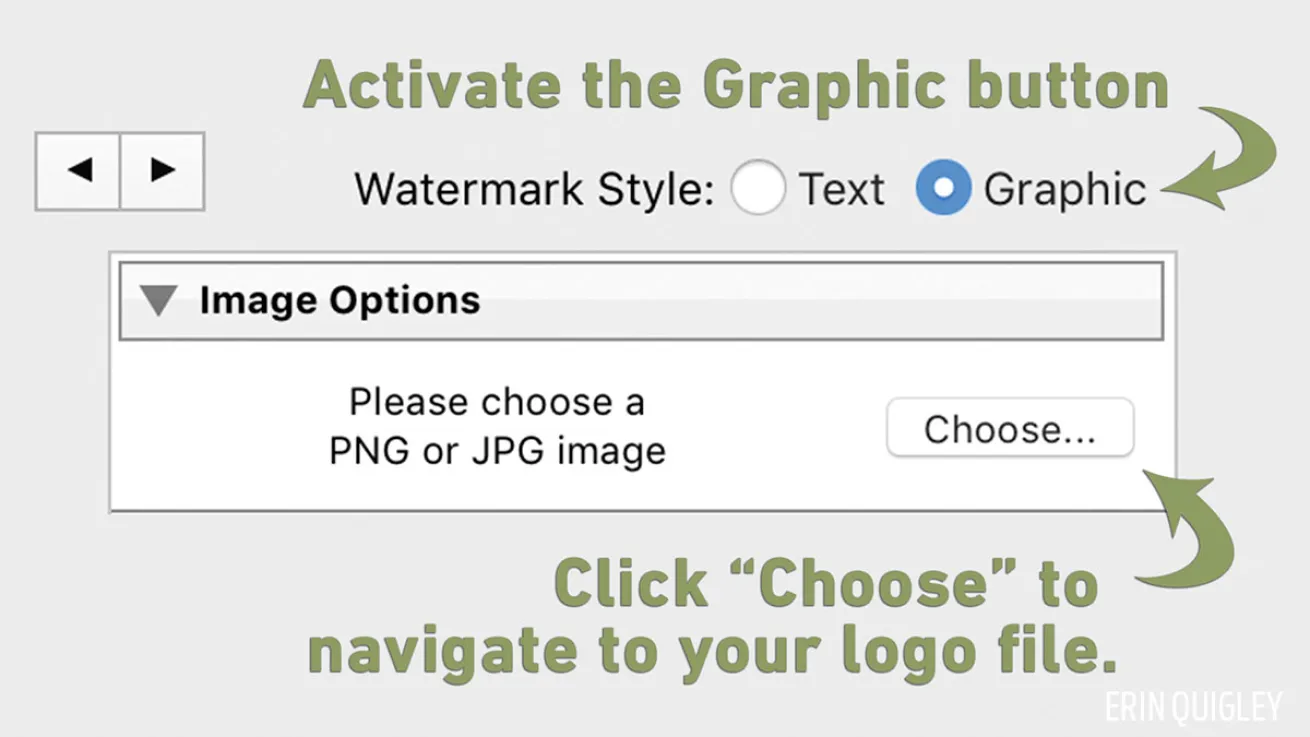
Erin QuigleyNavigate to the desired PNG or JPG logo.
The Text Options panel will be grayed out, but all tools in the Watermarks Effects panel will be accessible.
SAVING WATERMARK PRESETS
When your watermark is ready, click the Save button at the bottom of the Watermark Editor. In the New Preset dialogue box, name your watermark. I usually name the preset something like “Logo LR” to describe the content and location of the watermark.
EXPORTING WITH WATERMARKS
1) In the Library Module, select the images to export and click on the Export button, or go to File>Export.
2) Check ON the Watermark checkbox and either choose an existing preset, or scroll down to the bottom of the preset menu and choose “Edit Watermarks...” to access the Watermark Editor.
Watermarks can be applied to one image at a time or to multiple images simultaneously, but you can’t select different watermark locations for the different images in a batch export. Clicking the arrows at the top of the Watermark Editor lets you toggle through multiple images to make sure the placement looks right on each one.
Erin Quigley is an Adobe ACE- certified digital imaging consultant and an award-winning shooter. GoAskErin.com provides custom tutorials and one-on-one instruction for the underwater photographic community.


